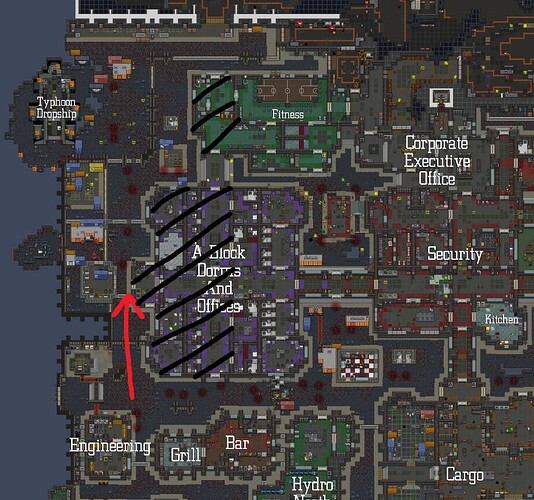
And what are the downsides of the attached plan compared to the usual A-Block and fitness push? Red arrow: how the marines get to the reactor. Black lines: where OB/CAS/BRUTE rockets/mortar/C4 is used to flatten the buildings to make it harder for xenos to flank.
downsides:
-xenos are experienced in defending these areas, you will likely have no initiative with which to push through reactors
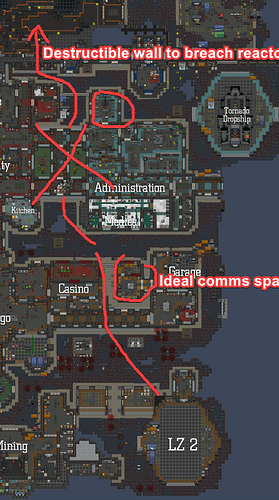
-comms are probably further away from the LZ and out of the way of the main path to the frontline, making it easier for backliners to disrupt comms
-sensors are on the other side of the map
I’ve found some limited success in pulling LZ2 then rushing sensors and hive from east. It only works with surprise anyway, I imagine if it became any sort of meta it would be easy to counter with xenos flanking from marshals into sensors then surrounding marines.
Downside of the plan drawn out: getting marines to actually do it
My non Ablock slop? LZ2 rush east reactor, you either win or die in a blaze of glory
the wall you have the red arrow through is unbreakable first off, and its going to go exactly like every other a-block fitness push because if your remotely on that side of the map you have to go by them. i hate to seem so jaded and defeatist and the “getting marines to actually do it” point shouldnt stop anyone from trying unless its truely ridiculous, but yeah, its a pretty big factor. other ‘different’ chances plans just include going cargo-security-corpo and central processor entrance in (flank and backline hell); LZ2 sensors rush; LZ2 sensors rush and OB/destroy the breakable processor wall NW of admin; and as campin mentioned a classic LZ2 rush east reactor and gigaflank or (much more likely unfortunately) get gigaflanked
As drawn, unfortunately this does not work because the wall is unbreakable.
Marines typically are much more familiar with the OB a-block, rush fitness, OB again at reactor choke, hope queen fucks up and dies somewhere along the way plan. So it has the benefit of people generally understanding what you’re doing.
I think there is an alternative good strategy on chances:
The area marked with a red X actually only has like 10 walls in it total that you can decon really easily to push north to sensors. Once the xenos are kicked out of medical/admin, the only way they have to get back in is via the long flank from the eastern reactor flank, which is tenuous at best and involves lots of open ground.
They can still flank from central reactor, but you can force them out of it fairly quickly on the main push.
Getting marines to actually do this strat is borderline impossible in my experience though.
My hot take to you is that there’s no ‘go to plan’ for every map because every map follows the same logic of momentum.
Can we push through? No?
OB it.
Can we OB it? No?
Flank it.
Can we flank it? No?
Fallback.
As long as your backline is clear, you’re not overextending yourself for a flank and you follow the above, you’re fine.
CAS and Mortar are important. OBs are integral. Ammo is a necessity.
Outside of that, follow whatever ideas you have. Fuck the meta, follow the logic.
Anytime I lead an operation on Chance’s Claim, I did what you show in the image there, but I didn’t necessarily dictate where the marines got to reactors from.
Best to leave that open for improv and flanks, otherwise, NORTH is fine.
The main thing to keep in mind is that you can’t go “Get there, push, OB, reactors, win”
You need to whittle them down a bit. I usually predialed into A-Block, OBed during a xeno push and press the advantage. Kill as many without cover as possible, as fast as possible, and then slowpush until the next opportunity.
If the marines get to the reactor before xenos are weakened, the marines die.
That’s my humble opinion from a few bazillion CO rounds on Chance’s.
Summarized:
Honestly, I’ve been enjoying going LZ2 and then heading to the right of Administration straight to sensors, then breaching the caves from there. It bypasses a lot of the troubles you ordinarily have with A-block and catches xenos off guard as well. But you need to be careful about being flanked from elsewhere. I think, in maps like this one, picking an off-meta LZ helps a lot with avoiding certain strongpoints, even if you might have a weaker FOB or whatever.
I love Chance’s Cause of the Aesthetics and the fact it reminds me of Old Prison. Lot of Chokes that bog you down, requiring you to use tools and C4 to modify the area. Great skill check for SLs/Engis.
Anyway, most of the time I completely ignore all good common sense and do this:
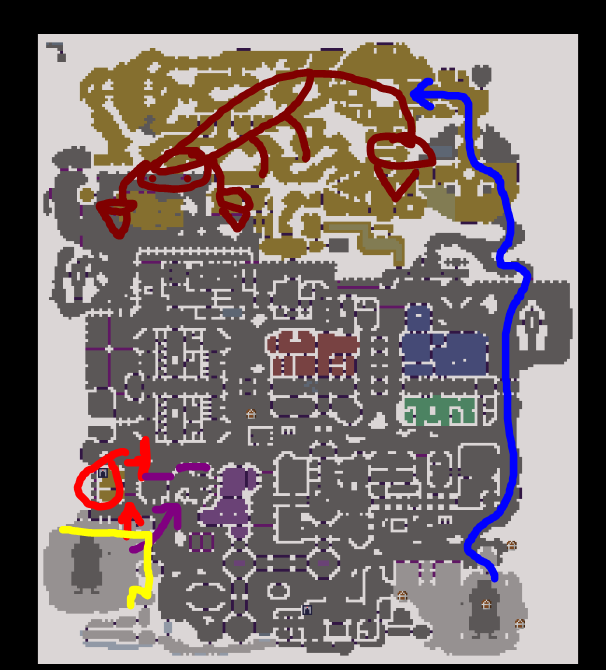
In League of Legends, I am a Toplaner. Mainly play Brusiers. in League as a toplaner who splits, you want to draw attention from the main team by having a lead/being annoying. Same principal applies here. Delta only exists to be a distraction. Instead of losing manpower to the corners in Dorms, you have Alpha/Charlie stall and secure the location. Just build up FOB first and comms. Maybe even have them laze an OB on dorms. But you don’t actually push in, or use the OB. Instead, you wait for Delta to provide a distraction by either being found, forcing Queen off Ovi, or Killing the Queen. I’ve done all three in seperate rounds. A joke me and Hunter used to have is he got “field promoted” to CO during one of these (his CO app got accepted while he was XO during a round of mine). I managed to die while also killing Queen, but Alpha/Charlie got yeeted instead of waiting on Delta to get into position first. Absolute slaughter of a round.
While the entire Hive’s attention is focused on Delta, Delta just fucking runs leading the Hive on a wild goose chase. Meanwhile Alpha/Charlie get free push into - oftentimes - padlocks themselves. You easily get past dorms, and can either have Delta extract, or use that giant South-central Street on the map to just walk west past Sec to get to Alpha and Charlie who are often in Fitness.
I would ask you to think about the squads themselves as water. They apply pressure in all directions around them when they are there, or where they are not. This is often why murderballs fail because there is no pressure on the sides, leading to free caps/permas on the sides/backlines which have no pressure/attention applied.
Edit: Go Long or Go Home
This is what we need. Logic-based CIC map game. Seems actually fun.
im just gonna say what i do as queen so that you may figure out yourself what the counter to that by marine side is going to be
hive always eastern caves, hold ablock, force marines to use ob on ablock
then hold b-ball, force marines to ob bball
send backliners to cap/frag all IOs
repeatedly screech and cap marines at reactor entrance with boiler and runners
fin.
Also true. You can come in with an idea, but that doesn’t mean you can always execute upon it. Typically you have a few options for handling chokepoints and being stalled, and exhausting them without any push made is usually what causes a rout and operational failure. Fourkhan also has a good point, in that doing what marines typically already know means that the plan tends to go smoother, especially in the case of new or inexperienced SLs.
The idea, usually, as XO, is to corner the xenos, and destroy them. This normally happens at a hive (hence why I like the idea of bypassing ordinary strongholds and forcing the xenos to defend against your own initiative), but it can happen anywhere, and vice versa, against the marines. Flanking maneuvers can destroy your force, but you can also do the same against the xenos anywhere, theoretically.
With competent groundside command and constant communication with your squads, you can usually perform some great feats, but you have to recognize the limits of not only your own capabilities, but that of others. Once you are stalled, think about why you are stalled, and consider a fallback before it becomes a rout. Falling-back is fine, routing is not. Look for the signs, and listen to what your SOs and SLs say.
This topic was automatically closed 90 days after the last reply. New replies are no longer allowed.


