Guide to the Staff Officer: Eyes in the Sky
When marines drop onto the ground, they’ve got the field of view of themselves and the people around them. Their Squad Leader gives them orders, but he, too, is limited to his own FOV.
One of the most vital gears for a successful operation are the Eyes in the Sky.
The messenger. The watcher. The updater.
Most simply would call you, Lieutenant, the Staff Officer. The following is a comprehensive guide to orient yourself on how not to suck at your job, what to do if something isn’t by the book, and what you need to do to play your part to keep the operation afloat.
NOTE: This guide is meant to supplement, not replace, the guide to Staff Officer found on Staff Officer - CM-SS13 - Wiki. Use that page in conjunction with this page.
Starting Out
So you’ve woken up. Be it you’re either standing in your officers’ quarters right next to the CIC, or in cryo. Either way, you’re going to have to get yourself dusted off and head for the CIC, because that’s where you’ll (usually) be sitting at or running inside of for the duration of the operation.
You’re going to want to talk with the highest-ranking officer on the CIC right now. In most cases, this would be the CO or the XO. They’re either going to tell you to pick your favorite color or assign you to a squad that needs overwatch. In the event that they’re not available, pick a station that’s unoccupied.
Overwatch Terminals
There are four overwatch terminals in the CIC, each corresponding with a squad. From top to bottom, they are:
-
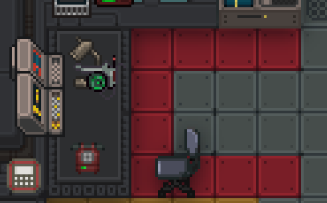
 Red: Alpha. Radio prefix is :a.
 -
 Yellow: Bravo. Prefix is :b.
 -
 Purple: Charlie. Prefix is :c.
 -
 : Blue: Delta. Prefix is :d.
Other Radio Channels
As a Staff Officer you have access to other radio channels that you can use to convey information to shipside departments. These are:
-
Command. Radio prefix is :v. Used for communicating with Squad Leaders, other CIC staff and department heads.
-
 MedSci (Medical/Science). Radio prefix is :m. Used for communicating with doctors and squad medics together. Useful to call medics to a certain area or notify doctors of an incoming dropship.
 -
JTAC. Radio prefix is :j. Used for communicating with Pilots/POs (on both the transport and CAS dropships) as well as the primary channel to call in other air-bound ordnance, such as mortars or orbital bombardments. You will usually not monitor this channel unless they ask for an orbital bombardment.
-
 Requisitions. Prefix is :u. Used for communicating with requisitions staff on ordering supplies to the battlefield.
 -
 Engineering. Prefix is :n. Used for communicating with both MTs (maintenance technicians) shipside, as well as squad engineers on the battlefield.
 -
Tactics. Prefix is :t. Used to communicate with Intelligence Officers for relaying intel and other useful data.
-
 Common. Prefix is simply ; (semicolon), usable only on the ship. Used for conveying general messages to all personnel shipside. The common channel cannot reach the planet, but it can reach the dropships as long as they are not groundside.
The CIC

Welcome to your workplace, the Combat Information Center (CIC)! Here is where you’ll spend the vast majority of your time as an SO. You’ll mainly be sitting at the left side of the room, by the overwatch consoles, while the commander(s) stay around the center, giving orders to both the Marines and you.
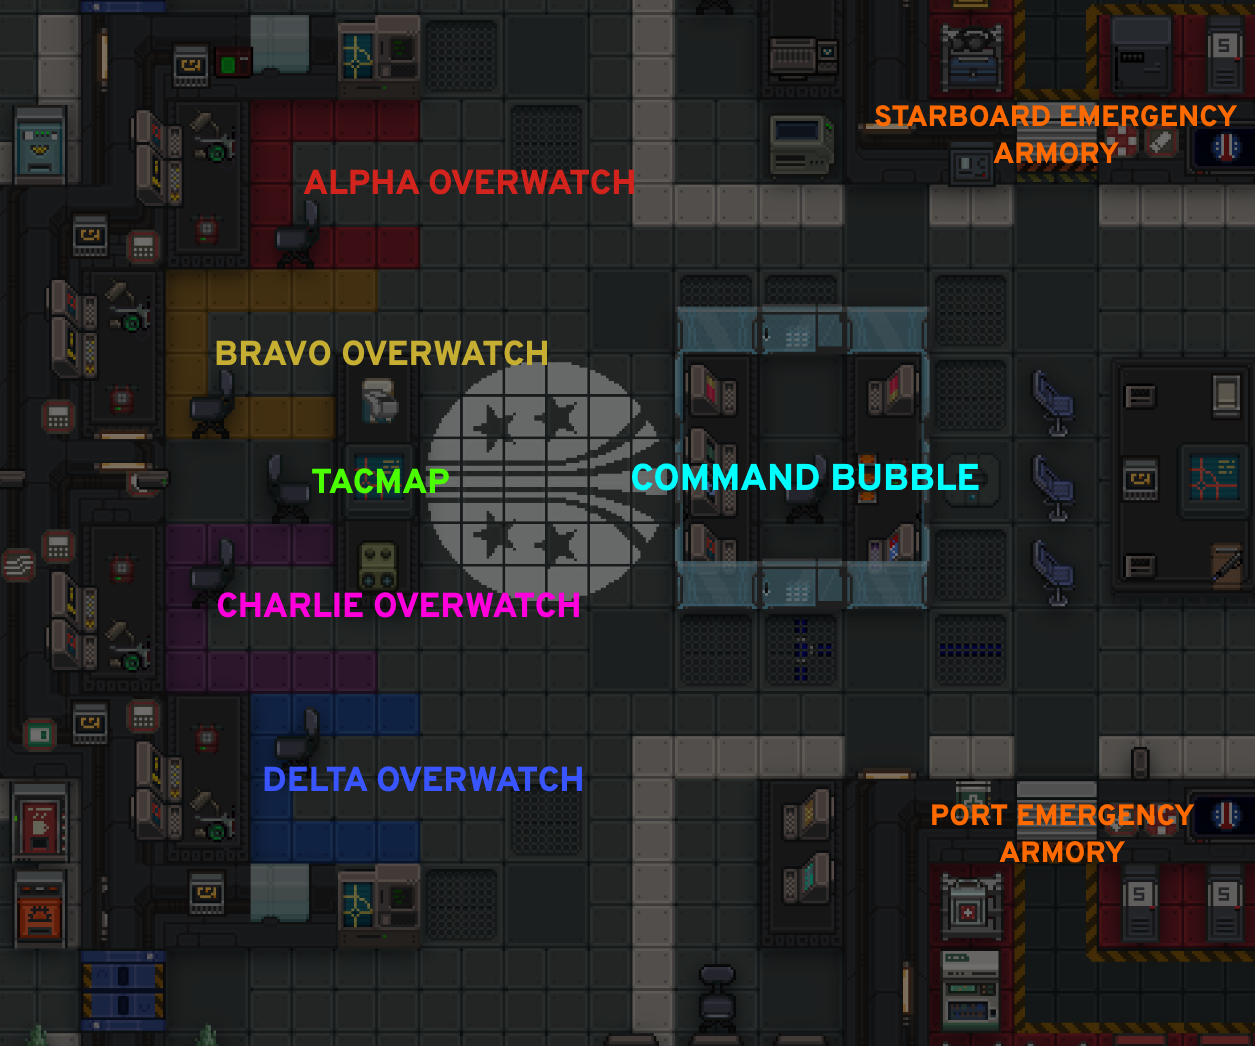
The Overwatch Desk
All your work is done at one of these four desks. Most (if not all) of the tools needed for effective duty are within arm’s reach or within the CIC. Each desk contains the following:
- The Camera Console. Useful for viewing security camera feed on the ship. Doesn’t work with cameras on the ground, unless engineers build some specifically tuned to the ship.
- The Overwatch Console. The most important one of the bunch, you’ll be interacting with this more than anything else. Allows you to watch squad members, change leadership, send messages, dial supply drops, and fire orbital bombardment shells. Yeah, pretty in-depth.
- The Medical HUD headset. Equipping this (by wearing it on your eyes) allows you to see the general health condition of any of your allies, including Marines, shipside personnel, and yourself. More info on this later.
- The Telephone. Radio Telephone Operators (RTOs) and other personnel will attempt to call you using these phones if radio communications are down or unreachable. Click the phone to pick it up, hit the use key (Z) to bring the phone up to your head and hear who’s on the other side more clearly. Note that bringing the phone up to your head drowns out radio communication on your headset.
- The Intercom. When shipside communications are down because of an emergency, or if you’ver lost your headset, you can use these to talk instead. Stand next to a desk and type :i to use the intercom. Alternatively, you can click on the intercom to turn its speaker and long-range microphone on instead, so you don’t have to stand next to it.

The Overwatch Console
Remember the Overwatch console (the one with the “2”)? Here is everything you can do with it.
-
Assign the overwatch officer. When you first start the console, this button will be a series of dashes. Clicking it will log you into the console automatically to pick a squad to overwatch from. If someone else’s name is on this, you can leave it alone or you can click on their name to override the OW officer with you.
-
Change the squad the console is assigned to. Unless you want to be a dick, assign this to the same-colored squad that the console is sectioned in: red for alpha, blue for delta, etc.
-
Message your squad. Clicking the [MESSAGE SQUAD] button allows you to send a message to the entire squad without using radio. Useful when communications is down (particularly during the start (and disastrous ends) of an operation) for when you need to communicate vital information to them.
-
Report a marine for insubordination. Is one of the marines acting particularly feisty, disobedient or outright insulting to you or the SL? Clicking this button will allow you to flag a marine for insubordination for MPs to take care of later.
-
View the tactical map. Pressing this (it might take a few clicks) brings up a map of the whole (visible) area of operations. Marines assigned to your squad are highlighted in that squad’s color. Other marines are highlighted in green, where non-squad staff (such as officers) are highlighted in light green.
-
View the squad leader. On the front page of the OW console lays the assigned Squad Leader (SL) . In the event that the acting squad leader is missing, out of duty, dead, or never woke up, you can assign a different, acting Squad Leader (aSL) by pressing the CHANGE SQUAD LEADER button to the right of their name. There’s a convention to this that will be explained below. You can also message the squad leader by pressing [MSG].
-
Set (and remind) objectives. Below the SL panel is the objectives panel, used for reminding your marines of what their primary and secondary objectives are. Pressing [Check] (if there is an already set objective) will send a message to the squad marines letting them know what their objective is. Pressing [Set] next to it will allow you to modify or set their objective.
-
Order Supply Drops: If requisitions has loaded a crate in their cargo bay onto the pad assigned to your squad, you can communicate with them to set coordinates for a supply drop to be sent to your squad. You’re going to want to ask the aSL where the drop goes.
-
Fire Orbital Bombardments: Used to issue orbital bombardments for when the going gets tough and they need a bigger bomb. See below for how to use it.
-
View your Marines through the Squad Monitor: Where you’ll be camping yourself most of the time. Pressing this button will allow you to view the helmet cameras of any marine by clicking on their name, as well as their role, status (alive/unconscious/dead), their landmark location, and distance from their aSL. Use this as your primary means of deducing the situation groundside.
The Tacmap

Clicking on the tacmap (short for “tactical map”) allows you to see the position of every Marine on the ground, allowing you to see how the greater operation is doing and what areas Marines are (or aren’t) positioned at.
Once you know what they do, you’re going to want to know how to use the information you’ve just absorbed.
Rise and Shine: Your Startup Routine
This section entails the standard routine for when you first start the round.
NOTE: The following information assumes the following standard practices: you are already present at the start of the round, that the CIC has a CO and/or an XO as the acting commander (aCO), that briefing is at 12:20, that the Alamo is selected as the primary dropship, and that the Alamo lands at 12:27. In reality, all these factors can change, so you have to adapt to the circumstances.
12:00 - 12:20: Preparation
As soon as you’re in the CIC, you’re going to want to get things set up. On your overwatch station (and any others that are unmanned) you’re going to want to start up the OW consoles by logging in and assigning squads to them. All you really need to do is to check if a squad has a squad leader and, if none are present at the beginning, assign one.
Once you’re done making sure all terminals are set up, you can leave them for now. They become useful once the marines are planetside.
While you wait for briefing to be called, you can either rest for a bit in a room of your choosing, head to the briefing room early, or otherwise check in on departments or squads to see how they’re doing. Maybe even do a bit of smalltalk with other CIC staff - talk about life, what some squads are like, maybe even gossip about the MPs. Have a bit of fun through nothing but conversation.
If you’re already assigned to OW a squad, wait a few minutes for them to get suited up and give them a nice little message saying they’re under your jurisdiction. Wait for the cheers or jeers.
12:20 - 12:24: Briefing
As soon as briefing begins you can choose to sit in the center platform where the aCO is giving orders. You can sit in a chair or, if the aCO allows it, stand next to them on the central podium.
You’re going to want to listen to what the aCO is saying for the marines - especially regarding the orders given to your squad. Memorize it, write it down, or wait for the aCO to tell you what their orders are so you can relay it to your squads and set the objective.
12:24 - ~12:30: First Drop
By the time the Alamo is confirmed to have touched down at the LZ, communications are going to be down and you won’t be able to hear what marines are saying down below, nor are they going to hear what you or the rest of the Almayer have to say up above. It might take 2-5 minutes for comms to be set up, so you can sit a while and silently watch the marines as they fan out to their objectives.
While you do not have radio, you still have the ability to message the squad (and its aSL) as well as set their objectives to give them an idea of what to expect.
12:30: The Operation
When comms are set up, you’re going to start hearing radio chatter from marines planetside. If you’re uncertain, state something (like “Comms check”) over the radio and see if someone responds or not.
This is where the fun begins.
Running the Operation
Details for what to do during the heat of battle.
At the start of all this, you’re going to want to see what your marines are up to. Are they at their objective? Are they coasting around gently or are they already engaged with xenos? Check in on this and, if you have to, relay their status over the command channel for SLs and the rest of leadership staff to keep up with (e.g. “Alpha has engaged with contacts in hydro”).
Babysitting
During this time expected to keep watch over your own squad to see if they’re doing all right. Look at where everyone is and notify the squad if a marine is noticeably far away from their squad. If their helmet camera isn’t on, they’re unconscious, or they’re unresponsive over the radio (or start screaming for help), they’ve been captured. Notify the squad about this but don’t allow them to go on a heroic rescue mission to retrieve their comrade. It’s likely they’re deep within enemy territory by then.
You can also notify your squad if a marine is dead or captured - you are heavily recommended to do this if it’s the aSL, Spec, or SG. Letting marines know how many roles they have filled in that are still alive can allow them to weigh their options more effectively. Check in every once in a while and, if the SL is rendered unfit for duty or dies, assign a new aSL from the home page of the OW console.
Commonly on more labyrinthine maps such as Prison Station, there might be a marine or two who’s lost or separated from their squad. If you have the time to spare and aren’t focused on anything else, try guiding them back to safety. Use both a separate map (you can find image maps on the Wiki), or use the tactical map and try to isolate where they are by cross-referencing the tacmap and their location on the Squad Monitor. They’ll usually be all by themselves, too. You can either give them individual directions to the bulk of their squad or simply give them how far they are (and compass direction) from their aSL. Since the distance meter in the Squad Monitor reflects the distance from the aSL to the marine and not the other way around, you need to invert the direction so as not to lead them in the opposite direction of their squad.
That Man Is Dead: Using Medical HUDs
What a lot of SOs should do more often is to use Medical HUDs found in the medbay to oversee squad operations.
Medical HUDs can be acquired by pestering medical to get them for you – you’ll usually need to be inside the medbay for this to have much of an effect. Once done, you can equip it in your glasses slot.
What people don’t often realize is that MedHUDs function even through the overwatch console , meaning you can see the health of anyone within your camera’s view as well.
Not familiar with what the icons mean? No worry. Save yourself from having to navigate to a different page by knowing these key things:
Icons:
-
 Red Cross: Person is alive. If they’re injured, they’ll have a health bar next to their cross that tells them their condition.
- The health bar is like any other health bar in video games: the less filled-up the bar is, the more injured that person is.
- If it’s flashing red, they’re in critical conditon and need to get a medic to them immediately.
-
 Green ECG Icon: Person is dead, but revivable. If they’re not being dragged away or behind enemy lines, call for a medic to try and revive them.
 -
 Yellow ECG Icon: Person is halfway to expiring permanently. It is recommended to prioritize these people over green icons.
 -
 Orange Flashing ECG Icon: Person is dead, and about to expire soon. If they’re behind friendly lines, tell medics that this person will be gone forever if they don’t receive revival immediately.
 -
Red Border Around Icon: Person is revivable (depending on the icon), but the player playing as them has disconnected from the game. Might take a while for them to actually get back on their feet.
-
 Skull: Person is permanently dead, and unrevivable. Don’t bother trying to get medics to this poor guy.
 -
 Red Flatline Icon: Person is dead, set to “DNR” (do not resuscitate).They can be revived, but they won’t come back on their feet again except for admin intervention.
Queen in Hydro: Relaying Communications
One of your main duties as SO is to relay information on what’s going on in other squads. If a Delta marine, for example, shouts that a queen is located in the western caves, you’re going to immediately want to forward that statement to your own squad (assuming it’s not also Delta) so that their SL stays well-informed on how the situation is unfolding.
You’re also going to want to relay messages that other channels (such as req) want relayed to marines down below, such as asking them for what supplies they want.
Remember: communication is key. Keeping marines and their leaders well-informed on the state of the operation is key to ensuring their success. Having marines roam blind without attention to the big picture is a recipe for disaster.
Requisitions and You: Ordering Supplies
Occasionally, whether you prompt them on what they need or they start asking you for stuff, you’re going to want to start ordering stuff from requisitions (req) through the requisitions channel (:u) to begin coordinating a supply drop to be sent.
The FOB squad and/or squads that have orders to reinforce/cade a certain area will usually be asking for mats (materials). Ask req to load up a mats crate and send it down to your desired coordinates - they’ll know how what to do.
Squad specialists may also ask for spec ammo of their choosing - magazines, rockets or grenades. Usually, echoing their exact words to req can communicate the right message (e.g. scout ammo, HE rockets). Regular marines or the aSL may also ask for additional ammunition to be sent down - ask them what kind of ammo they want and echo it back.
Sometimes requisitions will ask you to do a favor in return - launch the crate loaded onto your squad’s pad. (Ignore this if they’re talking about a squad different than the one(s) you’re manning). You can do this by opening the OW console to the home page and navigating to [Supply Drop Control] located near the bottom. Enter the coordinates given to you by your squad and fire away by hitting the launch button.
Tactical Explosions: Orbital Bombardments
If your marines are screaming over the channels a set of coordinates and instructions to “OB IT”, that’s kindly telling you to perform an Orbital Bombardment on the designated coords. Provided the cannon is loaded (ask to have it loaded over engineering comms if it isn’t), you can issue coordinates (again, communicated to you via your aSL) and drop an enormous bomb to potentially wipe out enemies – or if done wrong, your allies. Do not use this lightly.
To fire, navigate to the [Orbital Bombardment Control] located on the homepage of the OW console. You’ll be given the status of the orbital cannon, two coordinates to input, and a big red button labeled “FIRE!”. Don’t press this yet.
If the orbital cannon is cooling down, notify whoever ordered the OB that the cannon isn’t ready to fire yet. If they ask for how long until it’s ready, give them the time.
If it’s ready, but there’s text saying that a round isn’t chambered, ask over engineering comms to tell an MT to load the OB. Competent MTs will reload the OB automatically, but if they’re not paying attention or not aware, you need to tell them, and fast.
If everything checks out and the orbital cannon is ready to fire, enter the stated coordinates and, once ready, hold firing. Confirm over both command and squad communications whether it’s safe (or desirable) to fire the OB at the intended location. Say something such as “Holding OB on xxx, xxx. Ready to fire” in order to let them know it’s chambered and ready. If either an SL or the aCO gives the all-clear, press the FIRE button.
NOTE: The orbital cannon and supply drops will not launch or respond if you aren’t the designated OW officer for the squad. If the console isn’t responding for either (you’ll normally get a confirmation/pending message once hitting the button), navigate to the homepage and make sure your name is listed as the overwatch officer. If it isn’t, click on their name to override it with yours. The same also applies to changing squad leaders.
Note that delivering an unauthorized orbital bombardment or a bombardment delivered too close to allied forces (and ends up causing damage) may result in you being punished by the aCO or by MPs. Double-check the coordinates to make sure you haven’t forgotten, or have an extra, minus sign.
Avoiding Reckless Unga: Strategic Command
Your job is also to give the marines and, to an extent, the SL, overarching orders on where to go and what to do. Think of yourself as issuing the bigger order, while the aSL tells the squads how to execute said orders. While you shouldn’t micromanage normally (such as directing marines where to fire), you can step in if the SL isn’t doing what you want them to do, or they’re missing out on something.
You’ll need to have marines watch their backs, too – a well-placed flank, ambush or otherwise cutoff for your squad from the rest can result in a fast demise. Monitor them and make sure they don’t stretch too far ahead of themselves. Know their limits.
You’re also going to want to encourage marines to follow the orders they were given. However, if they constantly refuse to do so, you’re going to be forced to adapt to their strategy and ad-lib instructions as they go. You require as critical judgment ability as the SL in order to make sure your marines succeed at their objectives. You don’t have the same situational awareness level that groundside marines have, though, so try to avoid stretching your own orders farther than what you know.
Putting Differences Aside: You and Your SL
While you’re up there enjoying your air-conditioned office chair in the CIC, you have a Squad Leader, an SL, appointed in a leadership position down below, leading marines on the field. You’re going to want to cooperate with them above all else for judgment calls and tactical operations. You and the SL must never remain disagreeing on things – soldiers will always listen to their closest superior before ones they can’t see. If they make a call that you didn’t ask for, adapt to their strategies.
Remember, SLs have more awareness of what’s happening where they are than you have. They have a better ability to make judgment calls such as fallbacks or pushes, and as a result you have to learn to trust their judgment. Don’t babysit them, though, and if they lead their squads into suicide and there’s nothing you can do about it, just let it happen and let other squads know of that SL’s mistake.
In the event that your SL has bitten the dust, asks to be replaced or is otherwise out of commission, you’ll need to appoint an acting Squad Leader (aSL) in their place. The convention for the Line of Succession depends on rank up to and including Lance Corporal. From highest to lowest preference, in the line of succession are:
- Squad Leader (SL) - If they come back to life, it’s best to put them back in the leadership position.
- Radio Telephone Operator (RTO) - Best picks for aSL; they’re usually not preoccupied with much else and already have some leadership ability of their own.
- Smartgunner (SG) - Secondary pick; also capable of leadership when not busy mowing down enemies with their smartgun. Less talkative than the SL and SG.
- Specialist (Spec/Spc) - The last NCO (non-commissioned officer) option. While specs can lead if they want to, they will generally be too busy with their specialist gear to care about leadership, and can be very quiet most of the time. Save them for last.
If all of them are dead or out of commission as well, you’re going to want to skip the squad medics and comtechs (engineers). These people would much rather focus on doing their job (tending patients, building barricades) than be busy attempting to lead marines forward. In this event, assign aSL to either a volunteer PFC marine, or, if there are no takers, assign it to any marine in a central position on the battlefield.
TIP: Having an SL assigned at all times helps because it allows you as well as the marines to pathfind their way to a central marker. The aSL automatically becomes a tracking beacon for other marines to head for, as well as a reference point for you to see other marines’ distances from the aSL via the Squad Monitor.
When All Goes to Hell: The End of the Operation
Something went wrong. A good ambush lay siege to the marines’ defenses, a queen has devastated the playing field, or a badly-placed piece of air support ordnance killed half a squad. Either way, marines are now issuing a fallback or, in extreme circumstances, an evacuation. You have to employ a large amount of awareness to ensure they don’t trip over their feet on a mad dash back to the FOB. Tell them what routes to take and make a call on whether it’s safe to hold the line or not.
In the event of an evacuation, focus on relaying what the aCO wants done and try your best to make marines either hold the line or push themselves into the dropship.
Special Procedures
So the CO/XO is missing, you’re the only Staff Officer who woke up, or aliens are about to crash into the ship. This section will try to address some common problems encountered when things go wrong in the operation.
The aCO is Missing
If you’ve woken from cryo and find yourself in a situation where a Commanding Officer or Executive Officer has not woken up, the Line of Succession must be followed. This might mean you’re going to have to lead the operation if no other takers are available.
What people like to do is delegate command authority to a 1st Lieutenant of rank - this will usually be the Chief Engineer or the Requisitions Officer (other 1stLts are the CMP and CMO, who prefer not to take command most of the time). In case they’re either unwilling or unable to take command (most likely they won’t want to lead an operation), this falls down to the 2nd Lieutenants of the CIC (that’s you!) to take the reins.
In the event that this is you, and you’re new to Staff Officer, scream and panic.
No, I’m kidding. Ask for a mentor to help you through things and/or read up on the Commanding Officer and Executive Officer guides. This will often function as a forceful baptism into the role of XO. This guide does not cover that.
Understaffed CIC
You have a commander, but the CIC is understaffed, sometimes only down to you and the aCO. A CIC can function, barely, on only two people running through stations. Rather than taking only a single station, the aCO or circumstances might assign you to man an entire side of overwatch consoles, whether it’s the topside of Alpha and Bravo or the lowerside of Charlie and Delta. Either way, you’re going to have to double your awareness because you’re now watching over two squads instead of one. The aCO will (hopefully) cover the other side for you.
Make sure to not pay attention only to one squad (unless the other is dead, of course) – you’ll need to divide your attention between two different voices calling for their own needs. I hope you’re ready. Part of the requirements for playing SO is to be ready to handle more stress and labor than what you’re normally given. Don’t worry – if you don’t have these skills yet, you’ll gradually earn them as you play more and more of the role.
Reassignment
Req might be understaffed. MPs might be nonexistent. Some other issue needs attending to. In any circumstance, the aCO may, at any time, assign you to perform the duties of another department that doesn’t require too much skilled labor to perform (you’ll never be asked to perform surgery, for example), so you’ll need to proceed to your assignment and help out however you can. Ask the XO (or CO, or MP in their absence) for an ID access change as well so they can make sure you can use everything in the department.
Be aware that SOs can also be deputized by the aCO to act as rudimentary MPs when a criminal needs apprehending and no MPs are available to do the job. If you’re unfamiliar, consult the relevant role’s guide(s) to help you with that.
TIP: Playing other roles (especially Cargo Technician) will prepare you better for being deputized as an auxiliary officer when you’re an SO.
Deployment
Whether you asked for it or not, you may have to deploy to the battlefield to grasp a better understanding of what’s happening. Ask the aCO to unlock the armory for you and then grab whatever’s needed from the lockers (see below section for details on the armories). After that, proceed to the dropship and deploy just like any other marine.
Because you’re not linked with a squad (unless the aCO assigned you to a specific squad), you’ll have no marker telling you where your “SL” is – you have none. It’s advisable instead to stay close to other marines and perhaps move to a forward position that’s still secure if you’re not going to camp out in the FOB.
Your goal is leadership, not shooting. Don’t act like a glorified commissioned PFC with a bronze star – you need to act as a superior to the SLs to keep them in check, as well as direct the operation from your point of view. Keep in contact with command so you know what you’re doing.
TIP: You should not be using your weapon regularly in combat. Keep it reserved as a last resort for when the line falls back to you and you have to start shooting. It’s for this reason that most deploying SO’s take a shotgun.
NOTE: Dying as an SO can be heavily detrimental to the operation. Avoid being killed by staying away from hotspots unless you’re either the daring type or you have no other option.
Hijack: Dropship Crash
The operation has failed. Marines are panicking and the CIC is shouting orders as an announcement comes on that a hijack is likely.
This is where your (hopefully earned) hours of playing a marine on the battlefield comes in handy. You’ll want to swipe to code red – this can be done by navigating to the table east of the captain’s chair and having you and another high-ranking official (usually an LT or above) swipe their card on one of two authentication devices to declare a red alert. You can swipe your ID by taking it out of your ID slot and clicking it on the device itself until it flashes blue.
In the event that another officer isn’t available to do the swiping, you can also engage it yourself by standing in between the two devices, and swiping them at the same time.
Once red alert is declared you can ask the aCO to lift the armory shutters from the captain’s chair (you can also do this by yourself). During code red, armory lockers will be unlocked for you to take a gun from.
There are two armory sections in the CIC, top and bottom. Both sections contain staff officer armory lockers where you can equip yourself with armor and a helmet to better protect yourself against incoming threats. Weaponry is different per side – the top side houses MK221 tactical shotguns with shell rigs inside the lockers, while the bottom side houses M41A Pulse Rifle MK1s , with magazine belts inside the lockers. Pick one of them (most go for the shotgun) and move for wherever your aCO orders you to go – whether it’s the tank bay, escape pods, or somewhere else (including the CIC), you’re going to want to move there quickly.
Once the dropship crashes, anything can happen. My only advice is to be ready and be prepared for whatever happens next. You might die. That’s okay and that’s normal. The CO can die, too, it’s a part of the game.