So, you finally decided to get your sorry ass off of those AUD-25 dropships, huh? Well, this’ll give you a (hopefully) helpful guide on how to prepare, deploy and operate the AD-71E Blackfoot VTOL.
First come the preparations.
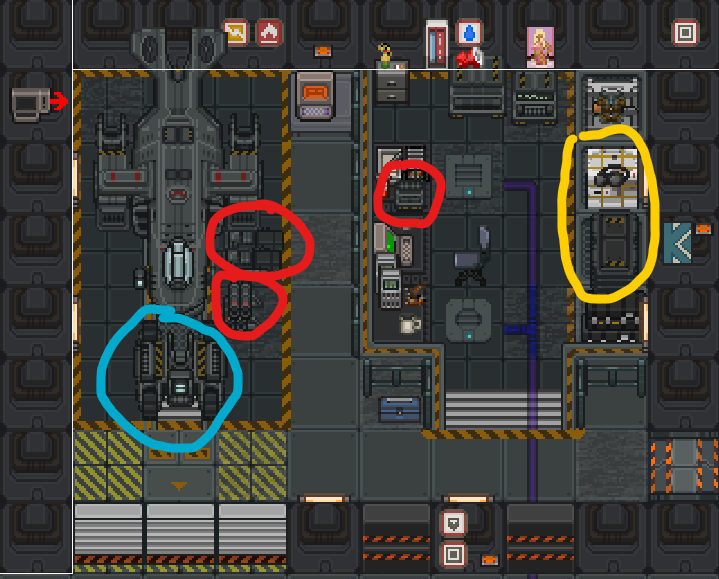
Blue is the Aerospace Tug, push it underneath the Blackfoot, precisely a few tiles to the north and it’ll latch on, letting you drive around so you can actually deploy with it, neat huh?
Red are the modules, consisting of the turbojet engines, starshell launcher system and the acquisition system. You need to install all of them if you want to use the VTOL at its peak.
Yellow is the core of refueling and recharging the VTOL, because if you don’t, you WILL crash and you WILL die, deeming the VTOL unusable for the rest of the operation. (Trust me, I’m serious, if you run out of fuel or battery, you will crash.) Load both of them on the alamo, or if you’re a controlling freak, right on your VTOL. Make sure to grab the toolkit and welding goggles, you’ll need them to repair and set up the crate.
The crate has the fueling system and landing lights, as well as the Chimera ammunition pieces you’ll load on the inside of the VTOL. We’ll go back to the interior soon. The landing pad is your start. You need to wrench it, and wait for the windup. (DO KNOW: THIS WILL OFFSET IT A FEW TILES NORTH-EAST, BE MINDFUL OF WHERE YOU PUT IT, BECAUSE YOU CAN’T PACK IT BACK UP. JUST LIKE THE TENTS.
Now, you’ve got all the preparations hopefully ready, now come the buttons.

From top to bottom, left to right, it goes:
Takeoff - Self explanatory
Landing - Self explanatory as well, do know you’ll have to line up the tail of your VTOL on top of the fuel line for it to actually register the VTOL as landed and ready for refueling. This worked for me the most. You also need to be in VTOL/hover mode to land successfuly.
Toggle VTOL - Switches between hover/VTOL and cruising mode. Hover lets you stay in one spot, but it consumes fuel WAY faster. Cruising constantly moves you in the direction your VTOL is headed in, without you controlling it, be careful with it.
Toggle Stow Mode - With this mode on, you can connect the tug, this comes turned on before you get out of the freezer. You’ll have to disable this after disconnecting the tug to be able to take off.
Disconnect Tug - Self explanatory, disconnects the tug letting you prepare for takeoff.
Sensors - Lets you turn on sensors, pretty self explanatory. Drains power.
Tacmap - Gives you your own tacmap which shows you where the marines are and how they’re moving, without needing CIC to update it. Neat feature, huh?
Night Vision - Turns on the night vision mode, it is rather grainy and drains some energy, just like sensors.
Toggle Engine Idling - Turns on your engine without taking off, necessary before you can take off, this actively drains your fuel if you’re not on the landing pad.
Toggle Targetting Mode - Lets you use the VTOLs starshell launchers, do know you only get four magazines, 5 starshells and 2 reserve clips, use it wisely. You need to select the hardpoint first before toggling the mode, or else it won’t register.
Unbuckle - Do I even have to explain this one? (Unbuckles you from the pilot seat)
(Thanks to Nivrak for these screenshots)
Now, we cover the interior of the VTOL.

Red is the controller for the rear doors, make sure to close them so you or your passengers don’t fall out. There is no windup to falling out, be careful where you walk! (The light indicator above the door provides you the information on in which state the VTOL is in, let it be landed or in the air)
Blue 1 and blue 2 are the side doors, self-explanatory.
Purple is the cassette player and one of the chimera loaders.
Yellow is the other chimera loader. It doesn’t matter in which one you put the starshell ammunition, it all gets fired equally. There’s also a fire extinguisher there.
Now, you might ask “But this ship’s fucking useless! It doesn’t have any offensive capabilities! What do you even use this thing for?!” Good question. While its pretty versatile, I got a few ideas from my own past experiences.
You can:
Recruit eight marines to do sensors, transport them to activate it without risking death within xenomorphic or otherwise CLF backlines.
Rapid extraction - IOs might be stuck on the other LZ? You’re their guardian angel, but you need to think before landing, it takes a LONG time to land and take off, giving enemies plenty of time to destroy your ship before you even reach the skies.
Transportation - Move marines to the front and to FOB, specifically injured marines who, will likely die alone trying to head back and forth.
Drop flares - Surprisingly, you can throw down flares through the backdoor, though this takes a bit of practice. Sometimes it works, sometimes it doesnt. Make sure to light them before hand. (Don’t do this with grenades, it probably wont work and you’ll kill yourself and possibly the pilot.)
And, a warning just in case, tell your marines when you’re in the air or on land, they tend to be quite fidgety, forcing them to get out, break their legs and die. You CANNOT jump out with a parachute, you’ll die. Warn your marines, gives your marines a greenlight when to disembark, don’t leave them hanging.
ANOTHER WARNING - DO NOT GET OUT WHEN THE VTOL IS TAKING OFF OR IN THE AIR. IF IT ENDS UP THERE YOU CANNOT GET BACK, IT WILL STAY THERE UNTIL IT CRASHES. IT IS ONLY THE OPERATIONS PILOT WHO CAN OPERATE THE VTOL.
More info might be added depending on what I discover overtime.