Update 05/25/24: Taking a small cryosleep darlings, I have a lot of thoughts cooking however I know the game has been updated a bunch in the last few months. I hope the Hive is seeing endless victories.
Update 02/24/24: Actually did some editting. Fixed the rambling in the Drone section. Have to fix some other parts.
Update 12/25/23: Merry Christmas, added a “How to capture the Tall” section
Update 12/20/23: Bless be QM, talls smells, haha you read this  big update happy xolidays
Update 12/6/23: fixed all the syntax errors on the page should look much nicer. Still not photos I’m just bald forgive me. Added a part two “Responsibilities of the Queen” that will be started once I finish with the rest.
Update 11/29/23: learning more about editing however I think this edit is bugged now for some reason, all those headers I have erased. Added some more will fill out later.
Update 11/22/23: Updated a few more sections, feel free to reach out on Discord with any information you think is lacking or ideas you have. It will be simpler, just include your XX tag (xeno ID tag i.e BOP) in your message. No pictures yet  . Happy Turkey Day!
Update 11/17/23: still no photos but the first chapter is mostly filled out!
Update 11/10/23: will make photos and gifs for the guide soon!
Part One:
"RESPONSIBILITIES OF THE HIVE"
Chapter 1 - Pain of Existence (think Round Time 00:00 to ~00:10)
I. A New Hive
II. Drone Tax, Drone Service, and Drone Responsibilities
III. More about Drones
IV. First “Complex Evolution”
V. Early Game Caveats
Chapter 2 - Glory of the Fruits of Loyalty to Queen Mother (think Round Time ~00:10 to 00:25)
I. Our Continued Proliferation
II. Capturing the Tall
III. Not Dying
IV. Responsibilities of T3 Sisters
Chapter 3 - Defending the Rightful Claim To Land Due to Queen Mother’s Divine Right (think Round Time 00:25 to 00:40)
I. What are you doing? What do you know? Do you know things?
II. Combat Caste Responsibilities on First Drop
Chapter 4 - Ideal Endgame Situations(01:00>)
I. First Marine Push is Wiped
II. They just keep on pushing
------------
P U N Y T A L L S
-----------_
“If I can do, you can do it.” - Queen Bop the 1st
Chapter 1 - Pain of Existence (think Round Time 00:00 to ~00:10)
I. A New Hive
As a new larva you are an extension of the Queen’s will and Queen Mother’s will. You are expected to drag dead bodies to egg morphers, report the locations of any survivors, slash any and all APCs, destroy barricades, call out areas to be weeded, ask for plasma to build, and at least sleep on the hive core until you are ready to evolve.
II. Drone Tax, Drone Service, and Drone Responsibilities
Evolving into a Drone immediately will allow you to serve the hive by spreading weeds. Maps like Solaris Ridge, Trijent Dam, and Shiva’s Snowball all heavily rely on early Drone’s proliferation of the hive. Solaris Ridge’s caves are notably barren with the worst weed coverage known to xenokind. Not to mention LV-522’s restrictive movement where you can find yourself in a dead end inside a nuclear bunker. These are all a lot of work to managa and the least you can do is save the Queen 300 plasma to plant a node. . . . . then . . . . wait for it . . . . to spread far enough to finish building the entrance to the hive for example. At least consider it before sleeping your eepy little larva heads on the core.
-
Drone Tax
A RolePlay for the Queen’s need to have the hive be expanded properly. It is mostly used in a command way like “PAY YOUR DRONE TAX YOU LAZY DAUGHTERS OF MINE”. It is not used commonly outside of the early game. Although all Drone Service is needed throughout the entirety of the game. You are truly blessed as a hive when there are one of each T2 Drone, and four Drones.
For new players, consider learning to fill these roles whenever they are vacant if you are unsure what you want to do. Burrower, Carrier, and Hivelord all have thorough duties that are in most cases obvious and there is a lot you learn about the overall working parts of the Hive. -
Drone Service
Nesting hosts, Capturing hosts, Digging tunnels, spreading weed coverage,… making things feel a little Hivey. The cold, dark, damp place, filled with your mothers labored breathing, and the dim blue light of Hive Core. That is what you are to replicate everywhere throughout the entire map. You see a light? You smash it. Think LV-624 Caves, thats hivey by design. Nice open path ways with many connecting paths and tunnels. After thinking of the LV-624 Caves, think about how not “hivey” any part of the New Varadero map is. The New Varadero caves are dry and barren like Solaris Ridge but with rocks that prevent doors and right up against an ugly metal structure.
So Drone Service in essence, is your learned game sense to complete tasks that would secure the hive’s safety in the event of an invasion. Kind of like WO. You are setting up your cade lines, making things accessible. Setting up traps. Unlike WO, you are preventing any advantage your would-be invader could use against you. Electricity, weapons, armor, medical supplies, and most importantly metal. A good practice for any new player is to check LV-624 beach secure storage. If its not melted into, you are melting into it. That is the epitome of Drone Service. -
Drone Responsibilities
Weeding new areas.
Pheromones are the most important part of the drone, if you are not emitting pheromones you are already playing the caste wrong. Its pretty simple you choose from three: “Recovery”, “Warding”, and “Frenzy” emitting pheromones costs plasma however the return on plasma recovery from emitting “Recovery” pheromone exceeds that plasma cost making it beneficial at all times to have “Recovery” pheromones selected. “Warding” pheromones is in my opinion one of the best pheromones with returns you don’t really consider. A sister on blue fire with 20% health is almost always dead without warding if there is only you(a drone) and her around for example. To quote the wiki: "Increases the needed critical damage for Xenos to die, and the damage taken by being in critical condition. Potent enough warding pheromones will completely negate bleed out. " This “Frenzy” the other pheromone that increases slashand acid damage, and more importantly SIGNIFICANTLY increases movement speed. Movement speed believe it or not is the most important xeno stat. Slow xenomorphs get caught out and die, fast xenomorphs evade and get away. If there is already recovery, and you are a leader pheromone emitter; “Frenzy” is a solid choice.
III. More about Drones
So you decided “Hey I guess I’ll plant froot today” type of sister (best sister) or “Hey I like the way these 2-d squares feel” type of sister (builder), did you know you have decided to be the lifeblood of the hive. Outside of obvious importance of T2s, T3s, and the Queen herself; drones are the best caste to be if you are bored of other castes or are new to the game. You can specialize in many different ways but the most effective I stick to is Standard Drone strain or Gardener or Healer, these have varying responsibilities based on the skill level of the player but there is nothing wrong with setting up your thick resin weed node and making a full garden in one static location for sisters to take from.
As for standard drones, you are also known as Builder Drones. You are fully expected to be making at the bare minimum some walls. You are one of three castes with the ability to build so if you find yourself being the only drone you have the entire responsibility of the hive building demands. You should limit yourself to two wide hallways at minimum. If that is the only width you build hallways for the hive you will get pretty far. Building structures is another situation itself. Never double stack doors unless the Queen wills it. Even when your Queen commands you to build double or triple stack doors. This will be the only time I suggest disobedience in the hive. THE ONLY TIME.
Structure sizes are typically left to 2x2, 2x3, 2x4, or 3x3. Anything larger than this very specific structure sizes in Area alone is hard to make useful. For example on LV-624 you should not be using large structures in the caves or on the beach. It is not only against the rules to make abnormally large structures it will get your sisters killed.
Doors are the best defense to an aggressive tall push, typically Hive Lords have the responsibility of “holding doors” but if there are none then YOU BETTER FIND A HALLWAY THAT IS BEING PUSHED TO PUT DOORS UP IN! If you do nothing else in the mid game than build doors in the way of a marine push you are doing a pretty decent job. (don’t let this go to your head)
Recent PR,
IV. First “Complex Evolution”
- Defender(Defender - CM-SS13 - Wiki)
WHERE TO BEGIN? Defenders are hands down the strongest most versatile xenomorph caste in the hive. They have armor comparable to Crushers, a significant health pool, and great abilities. They are good for new players and seasoned players. Being a defender means strength and power.
An overview of abilities:
Headbutt, my favorite ability to really BOP those PUNY TALLS really good. Arguably better than fling due to its low cooldown and if your crest is lowered you do a significant amount of armor penetrating damage. This means heavy armored talls will accrue organ damage and fractures more frequently.
Tail Sweep[not the name?], a truly game changing ability in both ways(dying or suceeding) due to its skill level. You being chased by 3 or 4 talls? Small juke turn around on them, knock them over and keep running! Tall keeps deploying m2c or heavy machinegun cqc? No problem rush them and knock them over! Yourself or the Queen is about to be put in crit by a robustoid tall? No problem slap those PUNY TALLS with your strong xeno tail. However missing a tail sweep means death quite often in these scenarios. It will lose you fights. It is similar to warrior lunge in the way it has so much potential depending on the scenario.
Fortify, frankly. The worst ability in the game if you aren’t Steel Crest specialized. Reasons: it locks you in place for 3 to 5s. Sure you get to the old Ancient Queen level of armor (65) but it has little significance for standard strain defender. However, in contrast to this, Steel Crest Defenders Fortify is a really good starter xeno for new players. Not to discredit what I said entirely, if you are as green as grass and have no clue what the fuck a xeno is: going Steel Crest Defender lets you Fortify while moving, while headbutting, and is most effectively used in unison with a boiler to protect.
I started my xeno main life as a Steel Crest Defender, it is a good starting point for new players. Do not think its not important its just… impotent. Bring back Iron Tail Defender please Queen Mother!
- Hive Lord(Hivelord - CM-SS13 - Wiki)
Underated speed demon. Overlooked lord of resin. Sure she is a lady but she is the LORD of resin. Hivelords are above drones and other drone castes in importance, honestly only less important that any T3 sister. It is the strongest builder in the hive and that is valuable. Only downside is less plasma regeneration than a drone which is noticable. Also the same abilities as a drone with a few exceptions.
An overview of their unique abilities:
Resin Walker is the only castable unique ability for the hivelord, requiring you toggle it to use it (like lowering your crest). This ability paired with frenzy pheromones makes you the fastest moving unit on weed resin. An overlooked power due to the hivelords meager combat statistics.
Thick Resin structures, is unique to the hivelord only. The Queen can build Thick Resin structures only for the first thirty or so minutes and while building on hive weeds. The hivelord can always build them and more importantly upgrade existing resin walls and doors to thick resin walls and doors.
Acid Pillar, great static defense tower if you put it in a location an enemy might not expect; while baiting them into it to take advantage of the surprise; or in general on any front where a lot sisters keep getting lit on fire. Actually their first usage is the utility of putting out fires, their acid damage is mediocre at best.
Reflective Resin Wall, you can build five(the same as the Queen). They are strong and reflect rockets, grenades(thrown or shot), fire from a flamethrower, and sniper bullets too. There is a lot of fun complex usage to these structures that might be covered in a more in depth part of this guide but I wouldn’t want just… any tall to read that so keep reading.
- Runner(Runner - CM-SS13 - Wiki)
The significance of the runner is really its mobility, not only are you the fastest (2nd) xeno in the hive off and on weeds, you have a pounce that can launch you across the screen to safety. It is important not to be frustrated with yourself playing runner (I am) not being able to hit every slash like some primes. Runners are built for scouting and recovering captured hosts. Capturing hosts and being offensive comes with time, knowledge, and experience.
An overview of abilities:
Pounce is a S-tier ability that can help you get out of any situation. If you are about to get -1hp stunned and are able pounce away to safety you will greatly increase the chance you survive a unfavorable encounter. Its other more important usage is to lock down straggler talls. Speed matched with the instant knockdown will allow any would-be runner to slash till the tall is disarmed (broken arms) or unable to move (broken legs). Typically you can get off two slashes before a tall gets up but BE CAUTIOUS, the amount of times I have died to an equally fast PB while next to or on top of a knocked down tall is too many times. Its just the nature of being a runner. SPEED!
Bone Spur is a thing! Just throw a little bone spur that will at least cause your victim to bleed. Mostly a harass ability with no particular usage known to me at least.
Tip of the chapter: It is now considered meta/rule-breaking to deliberately place traps to activate diagonally through a corner of wall or door. Unfortunate I know, they really need to buff xeno traps in some way cause they are more obvious than the sun in the sky. Do not be caught doing this!
- Burrower(Burrower - CM-SS13 - Wiki)
You are the sole tunnel digger for the hive, typically an essential xeno for placement of hives not near a tunnel originally. An effective one on one melee caste that falls short of being able to hold its own on the frontline. A true menace to the backline of marine pushes, taking a poorly defended comms tower by yourself, and ensuring the death of intelligence officers are the three main scenarios burrowers excel in.
An overview of their abilities:
Dig Tunnel has long cooldown and will pop up a text box to enter the name of the tunnel so don’t spam click enter. However you can right click any tunnel open the drop down menu to rename it at any time. Be sure to be specific, naming them correctly might take time learning how each map plays out.
Tremor is one of the better melee abilities in the game, if it did damage it would only be better. Knockdown any marine within a 3x3 tile around you can be paired with burrow to ambush a solo marine. Grab that tall, devour it, switch claws, and shove until its fully devoured. Easy captures.
Burrow, a channel ability that allows you to go anywhere in vision after channeling. If you go to a tile inhabited by an enemy you will knockdown them down which can then be paired with Tremor to help capture any unsuspecting tall.
Make Resin Hole, one of the few abilities that makes obvious the Burrowers plasma pool and poor plasma regeneration. Used to make traps.
- Carrier(Carrier - CM-SS13 - Wiki)
Is in a weird place for what “type” of xeno the carrier is, neither defensive nor offensive. It focuses on the proliferation aspect of being a member of the hive which has many manner of strategy involved. A surprisingly vulnerable xeno caste despite its health pool, and decent speed. In the early game you will want to gather as many of the ‘pre-bursts’ as possible into egg morphers to produce the facehuggers which are your main tool. Now an overview of their abilities:
Place Resin Hole, used to make hole in the ground capable of holding either acid or a facehugger turning those into traps. These are all 3x3 proximity traps so anything in the adjacent tiles will trigger it. Facehugger traps are able to knockdown talls trigger it, required 2 seconds or so before it actually hugs. They can jump up to four or five tiles far after being triggered so if you want to proliferate the hive talls, just walk into a egg morpher or a facehugger trap. The different types of acid you put into the trap produces different effects. For example, Boiler Acid causes it to become a Acid Gas trap or a Neuro Gas trap.
Throw Facehugger, use this ability to store and pull out facehuggers.
Retrieve Egg, use this ability to store and pull out eggs.
Carrier has a high skill ceiling surprisingly. Be ready to find a corner of the map and plant hugger traps all over.
V. Early Game Caveats
Melting locks, melting barriers, slashing talls, capturing talls, ERP( Erotic Roleplay EXTREME ROLEPLAY) with fake tall,… the list goes on for everything that can absolutely change a games playstyle for the hive or for the entire player base. Some things to note about the early game, (Synthetics)Fake Talls all lie due to their programming however you are meant to look at them with intrigue: The odorless, not-real hair, and dull metal looking skin all tell you this is NOT and this is a TALL.. No one daughter should be hunting the fake tall, ask mother, interact with it, and typically if you see it impeding your attempts to capture the survivors in a violent way should all spur you towards violence with a fake tall. After your first RP encounter with a fake tall you will hopefully be left with a interesting view on how you want to handle it in future instances cause you can foment their own betrayal of the talls by tricking them sufficiently.
Most of the maps offer meltable/breakable walls, doors, and blast door that might seem like a no brainer to melt to give access to the rest of the map. The best case of this is Solaris Ridge which offers not one, not two, not three, not four, but nine different locations on the map that are destructable for the sake of offering a new access to different areas. There is Lambda locks, Eta Locks, Filtration Locks, LZ 1 Comms north and south west, Virology locks, EVA locks, LZ 2 locks, and LZ 2 west wall. One or two of these will be forced open by the talls by default no matter what you do, they may even open them all up in the very late game if the hive hasn’t. Listen to Queen and always ask if its okay to melt the barrier between two different areas: "Queen do you want me to melt Virology locks?’ Unless she is bald as a new born Lesser Drone then she will be able to inform and instruct you on what she would like. I won’t give up too much strategy here yet.
Notable examples:
LV-522 Chance’s Claim - Eastern Reactor Entrance (Filtration), Central Reactor Wastewater Management Wall, The Crates conviniently blocking any street but more specifically the Western Crates blocking the Typhoon Dropship area.
Honestly come to think of it these might be only maps with definitive ways of setting the map configuration up differently and I might have just revealed the less common ones. I swear to Queen Mother, talls, I will IMPREGNATE proliferate the hive and make your life hell if you start meta-gaming these spots.
------------
P U N Y T A L L S
-----------_
Chapter 2 - Glory of the Fruits of Loyalty to Queen Mother (think Round Time ~00:10 to 00:25)
I. Our Continued Proliferation a.k.a Capturing the Survivors
There comes a time in every hive life cycle where they obtain their first host. One that wriggles, and spits back. One that might kill your sisters: the Survivor. There are a bunch of regulars that I could name… but I won’t cause their ego is already too inflated from killing drones and other xenos early game. Just know being a survivor, if you aren’t already, is a fun niche role for what is essentially the “early game” (its an episodic RolePlay experiece). You start with nothing but the will to be the biggest fucking inconvenience you can be to the hive if you know what you’re doing, or a fun little snack ![]() . There is a guide that outlines the different survivors just know that the two main things every survivor WILL do is have shotgun(the civilian one) to PB often times with incendiary slugs (only pilfered colony side) and have molotovs to throw at you or themselves.
. There is a guide that outlines the different survivors just know that the two main things every survivor WILL do is have shotgun(the civilian one) to PB often times with incendiary slugs (only pilfered colony side) and have molotovs to throw at you or themselves.
The armors vary significantly and generally informs how easy prey these targets are in a one on one setting. Pay attention to the attire of the prey in question. This is why capturing(shoving) talls is typically significantly more cost effective than slashing them one on one. Just generally, if they are missing their shots and you are in CQC: shove them. If they are hitting their shots and you are in CQC: slash their hands or feet. This is where Xenos most important ability the “Tail Stab” comes in handy. Its a strong melee attack with a decent chance of breaking bones due to its high melee damage (1.2x Stronger). If you are in the scenario where the survivor is hitting their shots and you are now being chased off weeds in your retreat you are likely dead unless you are a juke god. It is the worst situation to be in and honestly the best choice is to disarm and run while they are down. Slashing plus tail stab doesn’t gurantee disarm or breaks, sure you can try to game it by researching the games armor defence stats and their various quantifiable numbers but with experience you will recognize the power of disarm in this 2-d game. Its arguable the best way to win fights in any SS13 server in CQC; disarm, grab their weapon, kill them (obviously we are xenos).
II. Capturing the Tall
This is how you capture a tall in a few easy steps:
step 1 find a macro for switching your hands that you like and can reach while moving with W, A, S, D.
example: I use x’
step 2 switch your intent preferably using a macro as well to disarm (blue one)
example: ‘1’ Help Intent, ‘2’ Disarm Intent, ‘3’ Grab Intent, ‘4’ Harm Intent
step 3 shove tall down to the ground, should take anywhere from three to five shoves
step 4 switch intent to Grab Intent, click the downed tall sprite
step 5 switch intent to Disarm intent and switch hands. Immediately click tall sprite to channel the tackle.
step 6 start dragging the Tall to a safer location to devour, keep “channeling” tackle by shoving the Tall
step 7 switch hands to the hand that holds the Tall and click your sprite, switch hands back after you see the “buffering” icon above your sprite and keep shoving.
If you are a warrior steps 3 and 4 are replaced with “successfully lunge a tall”, rest is the same. Remember you are not in danger while you keep the tackle channeling. If they get up after two disarm attempts, you only have one or two more disarm attempts until the tackle procs. For runner thats less than 2 seconds, for other classes less than 4 seconds. Barely enough time for the more robust players to PB you.
If you are Crusher, stop. CROOSH. add +1 to your shoves.
III. Not Dying
There are many skills that come into the category of NOT DYING as a xenomorph player but I think we will start with an underrated skill. Closing Resin Doors Behind You.
As weird as it sounds, getting use to closing the resin door behind you will help you secure captures, save sisters, and zone talls. I will upload images and potentially gifs depicting the exact scenarios where your ability to just close a resin door will make you a decent sister to be around. However until then I will describe the three potentials aforementioned.
-
Securing Captures something I struggle with as well. Talls are usually quick to egress without fighting back when they realized they are in an enclosed resin room with you. Depending on if you are dragging a tall while tackling them to the ground, or if the tall has just been flung into the room get use to clicking on the resin door to close it! They can follow you through if you aren’t fast enough. It is always alarming when a closing resin door open because a tall is following behind you. You can always practice leaving hive as closing the doors to the hive is an important unspoken task. Typically it won’t matter but a few times bold scouts will be willing to follow you to the hive core if they can walk through the doors unimpeded behind you.
-
Taking risks is very much a part of being a xenomorph, there is no warrior lunge without potentially dying; no runner leap without the possibility of damage; no action a xenomorph caste will take that could potentially cost them their life. It is important to understand the quote unquote “game-ability” of certain abilities like Master of Defense, or the Spitter’s own Charged Spit. So you will have to get use to seeing crit(0 hp), maybe crit(<1hp), and on fire sisters running from a situation you would be shocked how they got into and taking the critical actions required to save that sister. IT IS PART OF BEING A HIVE MIND, the preservation of every part. You are allowed to roast, or show disbelief at some sisters own clown or bald understanding of a mechanic but you should not let them die. Opening doors for critically wounded sisters or sisters attempting to egress from a bad engagement is essential. BE VIGILANT.
-
Zoning talls is an entire chapter itself as it can be a macro sense of leading as a large group into a trap or an area where CQC combat is more viable, or the micro sense. This is dedicated to the micro sense of baiting talls to enter rooms enclosed by resin walls or door that you can trap them in to force CQC combat. This does backfire and it can, however it is typically best to pick apart their groups than fight them as a whole. It will not work as successfully with visible traps in the area you are “pulling” them into. Just two key techniques to this section:
a. baiting talls by appearing weak i.e. being low health a responsible distance away on weeds. Letting a tall slug you off weeds while they are a few tiles away from their group is a recipe for them all to chase you granted you can dodge or are close to where you want to pull them. I wouldn’t recommend either, this is more a thought exercise cause anything further would give away crucial meta you will learn from experience that is honestly unexplainable. “Why is BOP sister consistently getting to sisters while on fire and near death or -1hp stunned (crit)? Its cause she is bringing prey to the hive.”
b. “boosting” talls into an enclosed space, there is a lot of different abilities in the xenomorph hive that allow you to “boost” or fling a tall into an enclosed space. This should be the main way you zone talls, find one just a little to far away from its comrade and BOOM you launched it where there is a Zerker ravager waiting for it to slash for rage. Notably Defenders, Warriors, Oppressors (Praetorians), and Crushers (CROOSHER) have the abilities to do this. However Sentinels can do this with a combination of mechanics not exactly “boosting them”. Sentinels have their neurotoxic slash(Paralyzing Slash) which will cause a tall to fall over for a short period of time helpless. Dragging that tall to a further distance from its squad has the equivalent effect. During chases sentinels become incredible powerful as their speed is able to catch up to retreating talls and scatter spit them down giving other more dangerous sisters to catch them.
Tip of the chapter: Get familiar with intent switching, its the unique mechanic of any SS13 game and has extensive, EXTENSIVE, nuance skill and meta around it. (Robustness)
Popular to contrary to popular belief, talls (marines) are the strongest and most formidable foe to a xenomorph than I guess even Headhunter. Headhunters operate alone, hunters obeying honor. PUNY TALLSMarines are lawless groups of rag tag no good gun toting bastards. They love chasing, they love proving themselves and they have no hive to responsibly proliferate. To them you are just another target to kill with impunity(mortar, skyfire,fire,ob,slug stunning,hpr,rocket,etc).
IV. Responsibilities of T3 Sisters
Not dying. Up to this point in the early game you have only been evolved for five minute at most. It should not be much to ask you to not die. However if you do, just know you’ve made Queen Mother, Mother, and Your Hive very sad. You may receive criticism negatively or be made fun of, depending cause sometimes us xenos are very cold and cruel to each other. Take a deep breathe, realize that what you were doing was not IT and “Join as Xeno” once again to be embraced with indifference or cruel words from your fellow sisters. It is important to evolve and realize that other players can get angry at you for not using your T3 slot responsibly. Although just know, IT FUCKING HAPPENS. At the end of the day, you’re going to die at some point. You are gonna chase a survivor into an advancing tall first drop push through Corporate dome; You are gonna get set on fire off weeds at 20% health cause you were trying bait or game an engagement with a tall to your liking; You are gonna get surprised by the early Scout rushing out to catch you devouring the last survivor while your sisters are already in the tunnel heading to the hive with the rest.
YOU WILL DIE AS A XENOMORPH ENJOY IT WHILE YOU CAN,
NOT ANY PRIME
NOT ANY ANCIENT
NOT PALATINE NOT THE QUEEN HERSELF can avoid an unfortunate or inevitable death.
Be glorious, be ferocious, and be willing to give it all.
All T3s should be engaged in opening up spaces for xenos to fight in. They should be assisting mother in rallying other if they are leaders. They ought to cautiously be anywhere but a safe area. The amount of times I’ve died heading back from medical to the beach on LV-624 as a CROOSHER Crusher are numerous. If you are falling back, just like we talk about in the reverse in a later chapter, open space is your worst nightmare because marines don’t even have to aim at you they just have to hope their bullet passes your way.
------------
P U N Y T A L L S
-----------_
Chapter 3 - Defending the Rightful Claim To Land Due to Queen Mother’s Divine Right (think Round
Time 00:25 to 00:40)
I. What are you doing? What do you know? Do you know things?
The Talls have JUST LANDED. You are on West T-Comms Road trying to desperately claw out the PUNY SURVIVORS who refuse Queen Mother’s blessings. Did you know you’re all alone healing out in the open? Don’t panic, this is a situation a lot of xeno players have found themselves in. This is where changing your Queen Indicator to a nearby Tunnel can save you from the Invading Talls Delta Squad from chasing your xeno tail to death.
For Example, on LV-624 another solution is to juke the talls out in the southwest jungles, granted they don’t have motion detectors, and hide until the fog drops. Its not preferable but you staying alive is essential to the hive’s well being even if your as bald as the talls who take an ammo box of 10x24mm, as many extended mags as they can hold, and then die chasing certain local prime lurker around a dark corner only to be head bitten or captured only consuming 50 rounds of their 1000 rounds.
Now you’re on our metaphorical side of the beach, if its not LV-624; you’re at the bar or at filtration on Solaris Ridge; you’re at the southern checkpoint or at the Hydro bridge on Trijent Dam; you’re at some location other than where the survivors were or where your Queen mother tells you to be. This is the one time you should 100% listen to orders as the invading talls aka metal talls aka sky talls or any variation of that have a plan to kill your hive, your sisters, your lesser sisters, and your Queen.
II. Combat Caste Responsibilities on First Drop
- Lurker(Lurker - CM-SS13 - Wiki): Position yourself on the flanks or at the edge of their Line of Sight (LOS). Report constantly on where they are headed or what they are doing. Do Not Pounce on groups of 4 or more. You are meant to be positioning yourself on the “backline” a concept this guide has not thoroughly explained. The “backline” in short is where the motion of the tall force is not directed towards. Think of LV-522 Chance’s Claim where the only options for the main marine push is north. Unforgivably north (at least before the wall). This means you should be off to either side of their north-ward direction in this given scenario. This is where you will drag and kill talls, this is where you will capture them when they are stragglers. If you chose to strain vampire its only different as you can just frontline.
An overview of their abilities:
Pounce - Strong ability, very useful however one caveat: there is a short pause after successfully pouncing where you can’t move immediate. This is where you are most vulnerable but after that turn on your crippling strike and drag the marine away to be captured or killed. Good for evading, obscuring, and ambushing. You can pounce over un-barbed cades, and the portable cades leaving you at the whim of your cooldown before you can escape.
Turn Invisible - An ability that has been a point of contention among the player base for a while. It is powerful but don’t overestimate it. If the area is well lit seeing a Lurker’s silhouette becomes much easier to see with experience. That being said there are really two effective ways of using this ability:
- Use when you spot prey
- Use when you are anticipating prey
Tip of the chapter: Justing turning invisible or using abilities without a cause can get you killed while those abilities are on cooldown.
Crippling Strike - Similar to sentinels Paralyzing Strike, however it is only usable on downed or resting enemies. The victim of your Pounce for example will receive EXTRA DAMAGE and be SLOWED. If the victim gets up before you can get off your slash, the ability will not activate.
Vampire
This strain is maybe the most “keyed in” or tuned melee strain in the game, for T2s at least. Headbite use to have no delay. Tailjab use to be able to hit multiple enemies. I’m sure there were other changes to this amazing caste but its due to the exploitative nature of being able to permanently kill someone, perma’ing. In this game there are no respawns. Meaning in the current meta, body piling or gibbing is popular even when unnecessary. There are very robust ways of gibbing talls that aren’t intended. Hedgehog. Then there is the ripping off of heads. This class offers the easy inbetween Headbite.
Rush - Clear the distance between you and your victim, it is a 4 tile body check essentially. Its not a pounce. Its not a lunge. Instead of grabbing or knocking down, you slash and make the tall stumble around from their screen shaking. Its a really nice ability that allows you to slash twice in quick succession.
Flurry - Follow up Rush with this ability to add even more slashes to your combo. It will heal you for the same damage you deal (30) per target you hit. Nice AOE and doesn’t interrupt regular slashes meaning you can hit four strikes in less than 5s if you aim correctly.
Tail Jab - Great ability, does damage as well as knocks the victim off its feet. Does extra damage if you correctly sprite click them. Normally you wouldn’t open with this unless the tall(marine) is all alone, plus its easier to Tail Jab a shaking in the boots tall (from Rush).
Headbite - has a small wind up timer that is less than a second. Great ability for assassinating an unsuspecting patient of a tunnel visioned corpsman. I love assassinating talls with this ability and its one of the reasons why Vampire doesn’t get an invisibility I suspect. Typically you can run along the front to see downed talls that you can Headbite that can’t be captured due to their location or, if you know or suspect they are pain crit bleeding out about to die.
Unlike standard strain Lurker which is almost a nuisance on the front line, the Vampire can and should frontline. Particularly securing kills that would have otherwise been captures.
- Warrior(Warrior - CM-SS13 - Wiki):
Finally time to make you all into the baldest Warriors in the hive cause the xenos I was hoping would take a hint from the previous quote at the top paired with my intention to invite collaboration to this guide have left me on read. I kid, however I did hope that any of the actually good Warriors, OWL, TAG, TAI (rip), BIRD, SO, etc (I am blanking forgive me there is like thirty of you and you’re all prime for some reason).
So where does that leave the Warrior’s responsibilities on First Drop. Warriors excel CQC combat and have two separate abilities that Stun the target for a few seconds. This means the Warrior is fully prepared for 2 v 1 or even 3 v 1 combat versus marines given a small enough area. Given the Warrior’s lack of speed and sprite size, it is quite easily killed when not in an enclosed space or tight quarters. If you miss one or both of your Stun abilities: a failed lunge into a misclick Flinge; Expect sudden death.
With the summary of the Warrior’s capabilities, this means the Warrior has options dependent on the location. LV-624 first drop: Engineering is so well fortified and has the same size quarters as a US Aircraft Carrier with a tunnel nearby, perfect location for a Warrior or Warriors to gather to kill as many or capture as many talls as they reasonably can. It relatively safe given that on First Drop marines have no communication until they reach Engineering. Solaris Ridge: Filtration with just weeds, some of the best CQC you will find native in a building in the game outside of New Varadero or LV-522 Chance’s Claim. This is a great location that has longevity even after the talls have repaired and established communcations on the colony.
Longevity, that is the most important skill of the Warrior. Knowing that talls have communcation with each other should cause you to evacuate the areas I described above for more safe locations near the front or at other flanks.
- Spitter(Spitter - CM-SS13 - Wiki):
You can dissolve everything but reinforced walls and bulkheads. Charged Spit along with the health and armor of a warrior makes killing even fleeing Spitters almost impossible without stuns. The early game you should be helping with the early survivor cades almost immediately if you are not busy melting other metals. Once the talls land you should be with leaders on the front or on a flank harassing talls that have no cades.
That being said Spitters are the underrated, “true footsoldier”, of the xeno hive. Acid damage not being buffed is because a Spitter buff would ruin the meta. They can kill multiple targets at the same time, an Acidmancer if you would be so inclined. Charged Spit paired with Acid Spray will do a minimum of 45 damage to the legs and feet and an additional 50 damage over 4 seconds. That kind of damage will put any marines near crit, slow them down, and maybe even incapacitate them with organ damage. If you are able to get this crit off you could potentially capture or kill groups of two to three talls all alone. Not that its the function of the Spitter or what anyone in the hive would expect (I’ve done it twice, you have to successfully tackle at least one).
Using Charged Spit with Acid Spit does actually insane damage.
be careful robustoids pre-med sometimes
This is all to emphasis the strength of the Spitter. At the end of the day this is a game of skill and a game of chance since talls are not stationary targets so pick your battles accordingly.
An overview of their abilities:
Acid Spit - has a seven tile range which is two less than a Praetorian, can be paired with Charged Spit for a devastating acid burn damage over time on the target. They have to roll to get it off much like fire. Go in for the punish when they roll. If not they are gonna die in a few seconds anyway. Win Win.
Charged Spit - Give 5 bonus armor for a short period of time, and significantly increases your speed. Great for escaping engagements or starting them since it boosts the acid damage of your next attack.
Acid Spray - has a six tile range which is three less than a Praetorian. It does pretty mediocre damage on its own, not worth entire worth the plasma unless the target is alone away from others. Paired with Charged Spit it becomes one of my favorite damage over time abilities in the game, if you can manage to double charged spray acid with a fellow sister that is your new best friend. Plus the tall is pretty much instant pain crit or dead.
- Ravager(Ravager - CM-SS13 - Wiki):
Time for the first of the T3s, the Ravager is known for its well balanced and fun melee strains such as Berzerker and Hedgehog. Standard Ravager is also a pretty solid strain, however a key feature outside of the hedgehog is how squishy it is compared to other T3s almost comparable to Boilers or Dancer Praetorian. It is easy to get focused down if you are not use to switching intents, using your escape abilities properly, and being zoned by talls that are flanking you. Ravagers have the highest slash damage in the game however relatively low hp for a T3 meaning players will target ravagers almost always first. It so much easier to focus down a ravager that is not slashing well than it is to kill a crusher or praetorian failing to do damage.
Standard Ravager:
There is a lot to be desired from a Ravager and the standard strain delivers. For new players it may be preferable because it has been blessed with one the best escape abilities in the game: Charge. Its main usage is similar to rush however the utility of escaping an engagement at the click of a mouse is much more valuable.
- Crusher(Crusher - CM-SS13 - Wiki)
By Queen Mother’s acid why did you remove her armor and make her body blockable *needshelp. The Crusher needs something new I think, aside from that its a great bullet sponge and the standard CROOSHER has Master of Defense one of my favorite ability in the game. It use to be BETTER TOO but apparently fully blocking one whole attack is too “over-powered” (see Charged Spit nerfs). The Crusher has been nerfed to all hell making it a slightly less diserable Hedgehog Ravager with an AOE slash attack and no Quill needles.
Now the Crusher is in limbo between being a defender but deadly. An attacker vulnerable due to its speed and bodyblock meta. The standard Crusher is meant to be picking off overextending marines and picking fights with small clusters of grouped enemies in close quarters specifically. You start charging first drop marines outside of bar as a Crusher either strain on Solaris; you are dead. So what is a Crusher to do.
Fortunately the Crusher shares one quality with its mother: being absolutely feared. I’d like to think I have contributed to that but its in the nature of realizing its limitations. Especially on first drop, you only see Crushers when you’ve essentially “fucked up” as a Tall. Either you didn’t hear the Charger stomping or you didn’t see the giant hulking mass of the Crusher cross your screen.
Now the tall is alone trying to shoot you with its standard bullets doing 7 damage a hit when they hit. This is where the bodyblock meta is in the favor of the Crusher. They ran too far east into Filtration chasing a low health sentinel that they PB’d. They get CROOSHED and you stand in front of their egress. That tall is categorically dead.
However if you do not verify how many talls may be in that chase, and that area you decided to BB the tall to death is open ground; AND three of his squad mates are running up on you: Dead Crusher. Like seven times out of ten. So on first drop, Crushers should be the shepards, the herd dogs, the ones rallying her sisters to her and figuring out where the hypothetical line in the sand is for talls to be “overextending” for her to engage.
- Praetorian(Praetorian - CM-SS13 - Wiki)
If this xeno was comparable to a tall, it’d be their Specialist. It has almost every good ability you can think of in the xeno hive. Dash on Standard, Heal on Warden, Abduct on Oppressor, Vanguard has a Shield that regenerates with damage dealt, Dancer has Evasion and Impale which is probably the highest dps single target ability in the game. You don’t know what to do pick Praetorian. However, Praetorians have the most responsibilities to do for the hive. They are the fastest, the most well-rounded, and have pretty much no excuse ever being caught out or surrounded by enemies.
Standard Praetorian at first drop should be helping usher xenos back to safer grounds. Praetorian speed enables them to properly evade and keep hostiles at a distance while being able to fallback with the Standard’s Dash ability. Once at a safe location to engage talls at, you will want to spend as much of your time spamming your acid abilities. They all do solid burn damage and are the strongest acid spit is going to get. Killing talls with Acid is not easy though. Even when they do go pain critical, it can result in them being a safe enough distance away from you to be quickly recovered; burned kitted up; and with enough Kelo to kill a horse. While potentially receiving organ damage that gets worse over time, this just enforces the tall with a will for self preservation to play more cautiously.
So what do you do?
You get greedy, intelligently greedy. You rely on them following you just a little closer to where you can extend. Then when you get them with your Acid Spit and the tall goes down: *slashing noises. You do as much damage as you xeno can to that tall as fast as you can using the speed and the dash you were blessed with. Hit it with the Acid Ball or the Acid Spray while getting close enough(two tiles) to tail stab it and dash away. Now that tall is a dead tall.
Warden Praetorian at first drop it does as stated above for the Standard Praetorian however significantly at a decent range from the enemies you engage. Using the max range of nine tiles if you sprite click, you can slow down any push while building up your healing pool. Essentially turning you into a immortal ranger that keeps others alive. Warrior grabs, starts slashing. You start unloading Acid Spit until it dies and as the Warrior is about to get last hit by the sniper running to safety you heal her as she passes and she lives. Its a great feeling and that is something that is memorable when you’ve been the reason Queens and sisters have survived overextending.
Oppressor Praetorian
- Boiler(Boiler - CM-SS13 - Wiki)
Boilers are without widespread knowledge, the best xeno caste. From Trapper to Neurotail stab buff. From stopping tall pushes to decaying their disgusting abomination of metal cade walls. Sure they die like popping open a soda can lid but they are designed in every way not to. Now the new meta is “combat boiler”, you glob then run into the gas and tail stab and slash. Even before the tail stab buff it was valuable. However from the top two important things to remember as a Boiler:
-
Being set on fire at all is a death sentence.
-
Never specialize into trapper too early, globber boiler is almost too valuable for hive defense.
Personally, I never Trapper boiler because I like roleplaying as a Starcraft Broodwar Defiler. Using Deploy Traps with Acid Mines is useful for maximizing acid damage to marines and it decreases the cooldown of these abilities.
------------
P U N Y T A L L S
-----------_
Chapter 4 - Ideal Endgame Situations (~01:00 and onward)
I. First Marine push was a Wipe
The marines are numerous your mother just QM scanned the remaining PUNY LIFE FORMS left on the planet you wish to conquer and you see its OVER NINETY TALLS. You have been pushed into caves up to the Western Cave Choke just north of the Western Cave Entrance. You feel fellow sisters dying to explosions when you hear the Sky Light on Fire, YOU RUN! Its a cluster bomb thats a total whiff and as soon as it ends the talls come swarming from the choke towards the hive. There is a flank coming from central and with all Queen Mother’s might the Queen is Rallying a South West Screech Flank on the current push. Your heart stops as you see her walk out past the safety of the weeds and genuinely surprised twenty of the talls, SCREEECH! Five are captured and the rest of the hive slaughters this push. Suddenly there are calls for help on east of the Hive! Another push slaughtered and all of the sudden you have so much room to chase the remaining survivors.
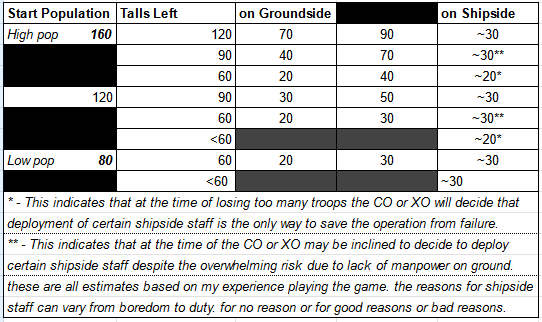
I would say this is a pretty common scenario when it comes to end game (maybe not those exact tactics). On the flip side this does not mean the Hive has won. Another QM scan tells us there is SEVENTY TALLS left. What this should say to you as a member of the hive is that the remaining talls are either retreating without any backup or have retreated depending on how recent this hypothetical scenario happened. There is a lot of nuance because at ninety or more marines(talls) left there is at least sixty groundside and thirty or less shipside. Wiping out twenty to thirty marines in a short span is guaranteed permadeaths(no meta). A quick little outline of talls left and expected groundside vs shipside counts.
[[File:ROHPopulationChart.png|border|figure #1: shows expected population numbers based on start population. this is all from my personal game play experience.]]
having trouble having it display : https://cm-ss13.com/w/images/8/88/ROHPopulationChart.PNG
Now you’re saying “Queen Bop the First, what the fuck does this even intend to teach new players?”; Well two things:
- Recognition of how player start population scales the difficulty for the xeno hive drastically.
- An Outline of what I am thinking when tall(marine) population drops groundside.
During this time you should be more focused on not Bodyblocking sisters and rescuing or saving them from any stragglers. Different castes have different worries during this time too. Among the most vulnerable to chase down a retreating tall push are Warriors, Drones, Ravagers, Boilers, and Burrowers. IT IS NOT UNCOMMON FOR STIMS AND THE Command Officer (Tall Queen) TO BE DEPLOYED AT THIS TIME. The Tall Queen knows the exact priorities of targets as listed above and is often times way more SPRY than she needs to be allowing her to reverse the role of this chase.
Warriors are strong and capable but their low armor and insignificant health pool means chasing off weeds is only successful if you aren’t getting hit from bullets. Typically we are pushing into the well lit marine line of sight meaning they don’t even necessarily need to aim at you! Once you are at 60% health chasing I would recommend a complete stop to your chase no matter the skill level. This is commonly where MANY PRIME WARRIOR SISTERS DIE partly due to their own hubris, and due to the scenario of chasing enemies in an open area they are retreating from.
Drones are retreating marines first target. Drones enable the chase and the enable the hive to expand. Killing even one drone during a marine retreat significantly increases their recovery chances and chances to kill other sisters.
Ravagers while they can be excellent for killing marines in CQC a chasing ravager out in the open even one with the standard ravager evade are absolutely prone to getting -1hp crit and dying 100 tiles from weeds where sisters won’t have time to drag them to heal. They have an incredibly weak downed state and retreating marines will often consider the ravagers death more valuable than their living.
Boilers pretty much are always vulnerable during chase but the real trick is pushing with your vision extended in the direction of the chase and NEVER BEING AHEAD OF OTHER COMBAT CLASSES. Same as with the Ravagers marines will consider your death a high priority. Tall Queens will run circles around other combat class to kill you with her enhanced tall smg.
Burrowers it is vitally important to not partake in the chase, you can help with weeding but in my own opinion its better to be setting up tunnels to help the current push be sustained than be chasing or aiding capturing retreating talls. YOU WILL GET SLUGGED and YOU WILL DIE A DOGS DEATH cause Burrowers are slow as fuck. Rely on your burrow ability to spread the weeds more carefully.
These numbers above are without complex scenarios like 20 groundside marines being sent up for hugger surgery or a CL event with 6 or more CL guards to accompany, or anything else. If you as a xeno player see the shipside tall(marine) count go above forty or fifty it either means you have had a good run of hugger traps and have been successfully maiming talls enough for them to be sent up. It could also mean a successful deployment of Foxtrot or other ERT that is entirely dependent on shipside staff. Especially towards the 01:00 hour mark of a round.
Not all First Marine pushes end in a wipe typically marines can hear your mothers loud fucking heavy feet on the ground and correctly Fear RP. It is a process that can take the entire mid to start of late game; for time comparison I would say 00:40 to 01:30. If the hive survives that long.
II. They just keep on pushing
Now this a part of the attrition aspect of this Episodic RP Event Simulator is where I would say most Queens and their hives will crumble to pressure, its not a surround. There are no cades, everytime you lose ground they gain it. COs will order their men to various regions, if for instance xenos are first engaged with at Medical Valley on Trijent Dam the main forces (Deltas/Alphas) will be pushing there first. Having their secondary forces (Charlies/Bravos) on the backline of the xeno hive safely moving up without resistance because the hive is already preoccupied with their first engagements as well. There is probably a more technical military name for it but to me its the “backline sneak”. Its “sneaky” on purpose due to communication delay or intentional plans of engagement to draw xeno forces into an area and then have their secondary forces flank them.
This will create a time period where the marines have successfully put the xeno hive in a vulnerable position, legitimately forcing the hive to give up more ground than normally would be. This is why its a popular tactic, and once they get the hive pushing they will just keep waiting for the next command. Obviously it requires a good amount of cohesion between all of their forces which is why its important to call out flanks whenever you think “oh I hope I’m not going to be flanked”. The whole purpose of
flanking is to change the flow of the enemies motion.
This is where being a xenomorph comes in full usage. This particular backline sneak could put formerly heavily fortified positions in a full surround. Having a tunnel, and having a hive cluster to repair will entrench the hive there almost indefinitely with hivelord and queen support. Taking a nearby tunnel past the flank will ensure every xeno that gets cut off lives and restarts the engagement with the talls to an equal ground. This isn’t always the case. On larger maps such as Trijent Dam or WW-522 W’s W(LV-522 Chance’s Claim), this can either end the hives life entirely with the backline being left exposed for so long or lead to marines ambushing the frontline xenos in a full surround. This is why Lurkers and Runners are most important in the backline: fast, able to stick to shadows, can confirm when other sisters are being flanked. I guess we will define backline as I understand it here now.
BACKLINE
(I will make images soon I promise)
The backline, as opposed to the frontline, is massive by comparison. It is “no mans land” for xeno and tall alike. There shouldn’t be much action in the backline aside from catching stragglers. The backline,
is the position your enemy would take to surprise you. A place you will find vulnerable prey.
That being said not all of the backline is valid, I don’t even think that is a term outside of CM to be entirely honest(someone tell me if I’m wrong). Places like their hiveminds(comms towers) which are often heavily fortified are typically in the limbo of backline or something I would recognize as harassment. It also depends on how heavily manned or how frequently the marines operation usage of that area. A good example on LV-624, if they take medical for the upgraded groundside surgery aspect that is NOT a backline. Fighting or attacking there is Harassment. Since they have taken the area it acts as a front which is why cading is so strong for marines. It actively takes ground away from their backline, their “no man’s land”. A border of functional safety.
Why is this where Queens and hives die?
This is a pretty common issue that happens in every game: caving under pressure. More precisely, not knowing where to apply counter pressure. Not having a hive that listens, not being able to correctly command the ones that refuse to operate outside of the shadows. It is round dependent, sometimes you get good daughters who can handle the pressure of a slow push combined with your wisdom of how to leverage the advantage against the tall front. Other times every attempt you make you lose ground and a T3.
On Trijent Dam this is where you will encounter the dreaded slow push from Bar Valley. The birdnests (Landing Zones) are located in the far south-west and north-west corners of the map and the river is typically acidic. Hiving in the labs or somewhere in the vicinity of the Excavation Valley means that either the talls decided to cross one bridge or decided to cross two bridges. Talls don’t like big numbers so pushing one bridge is the simplest command any officer can give. Given the checkpoints that essentially allow access to an entire area through a deadly 4 x 10 choke, all the talls have to do is slowly push to these checkpoints and hold. This is one of those times where having xeno players constantly try aggression by striking out, pulling back, and healing is dangerous. The slow push allows them to coordinate an attack on those few that just don’t let up. That plus how far away the backline of the talls is to the front means organizing an honest two-front defense or aggression plan among the hive is just difficult. Either there is too much distance to effectively rotate in time to support either front and requires good tunnels. Backlining is a death sentence cause there is only weeds on the roads and weed coverage is usually spread too thin.
This is where a T3s death means they are gonna move their cades up or start moving up as an Ungaball. Not only does the slow push emphasize the usefulness of CAS and Mortar coordination, it shows that talls with cohesion are a true threat to any hive. Its hard to say how to counter a slow push. On larger maps it means taking what ground you can before you are no longer able to: Trijent Dam Bar Valley kind of situation. On smaller maps it means enforcing a plan that keeps the hive together enough not to get picked off.
Tip of the chapter: Sometimes the best plan is no plan, depending on how unsure you are compared to how competent your hive seems to be. If you have a plan you are unsure of that gets the whole hive killed, you’ll never forget it. Just like this strategy, its good to slowly push back.
------------
P U N Y T A L L S
-----------_
Part Two :
Responsibility of the Queen
------------
P U N Y T A L L S
-----------_