Introduction:
Hi. You can skip this part if you don’t want to read it.
My name is Seabass. Also known as Landon ‘Hatman’ Hughes. My accolades are that I’m the original creator of Unga Juice (Not a lot of people remember, I’m not lying. I swear). I’ve also written the (very old) guide to Intelligence Officer. All this means is that I’m an old head, not as old as everybody else, but I’m here to be helpful.
I have to shoutout Flint Rocket, Kryth, and Randy Tennant for helping me on my OT journey. Without y’all, I would’ve been lost at OT and blown myself up more than I should’ve.
In any case, lately, I’ve been playing a lot of Ordinance Tech(OT). If you’re anything like me, you like researching, and maybe a little bit of reading. The reason why I wanted to make this guide was to bring to attention some fairly uncommon ins and outs of OT. Things that aren’t written down. Things that were passed on verbally from person to person. In this way, I hope more people play OT and/or don’t blow themselves up as much. Unfortunately, this guide will be very wordy, but hopefully I can format it enough to where it doesn’t tire your eyes out. Also note that this guide not comprehensive and it doesn’t teach everything. This guide assumes you know the basics of OT, but need a little help with the advanced parts.
Waking up for the Phoron Rush:
You’re on the USS Almayer. Fantastic. If you woke up as an OT round start, refer to Picture Two.
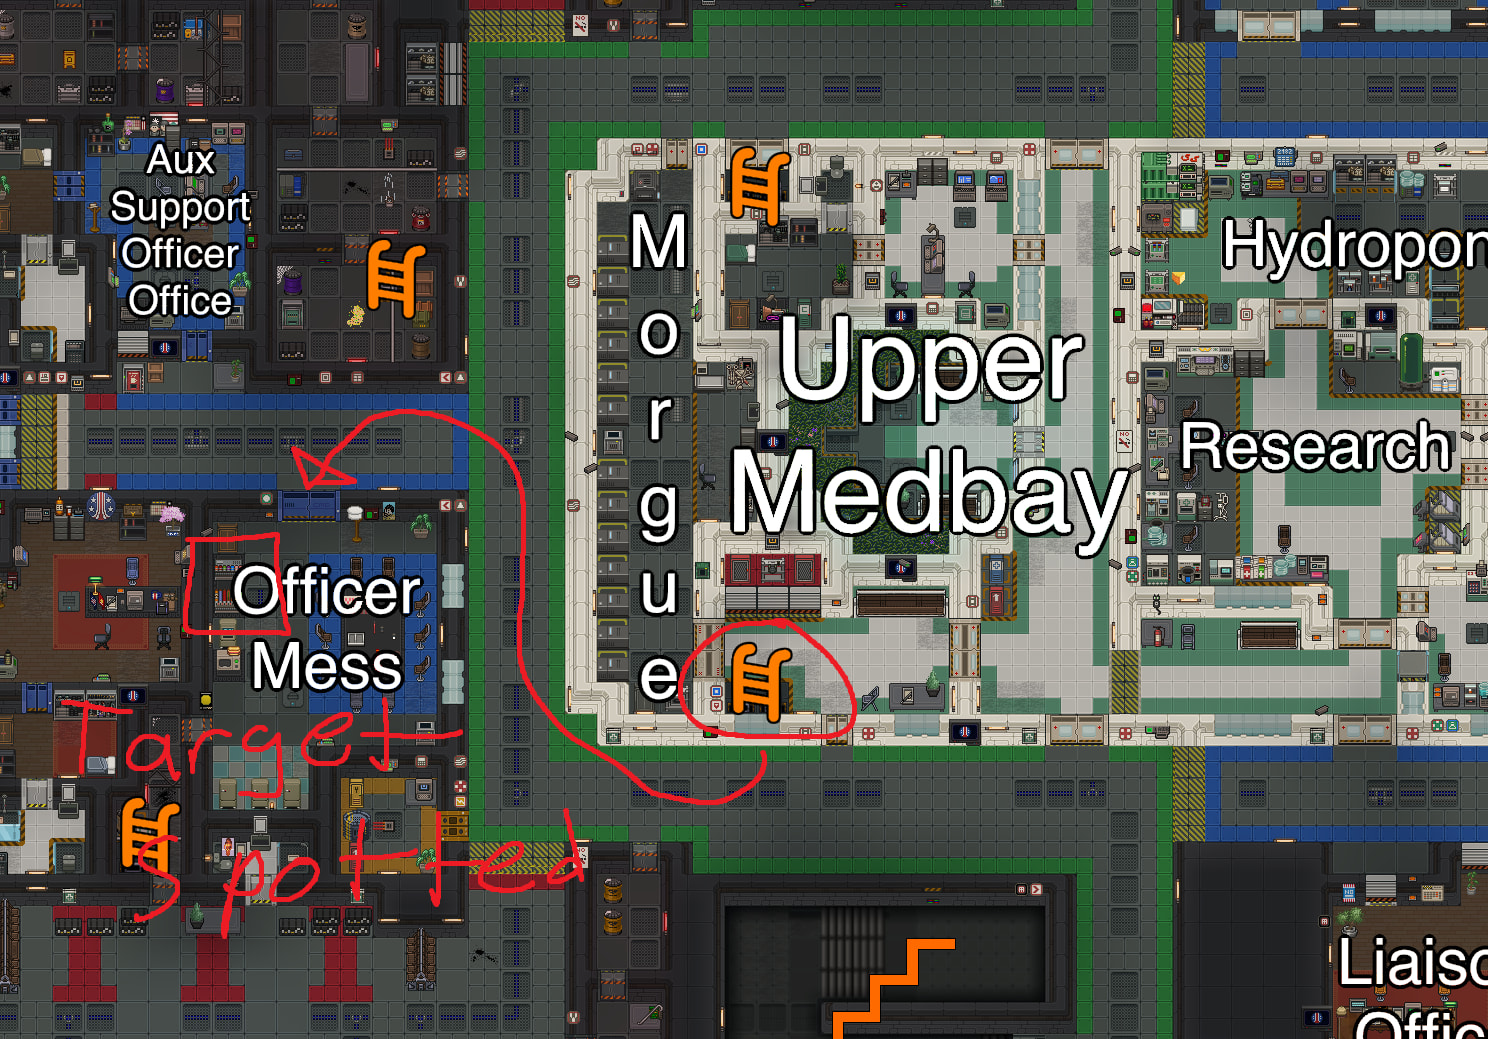
If you woke up late - Refer to Picture One, then to Picture Two.
Picture One:

Picture Two:
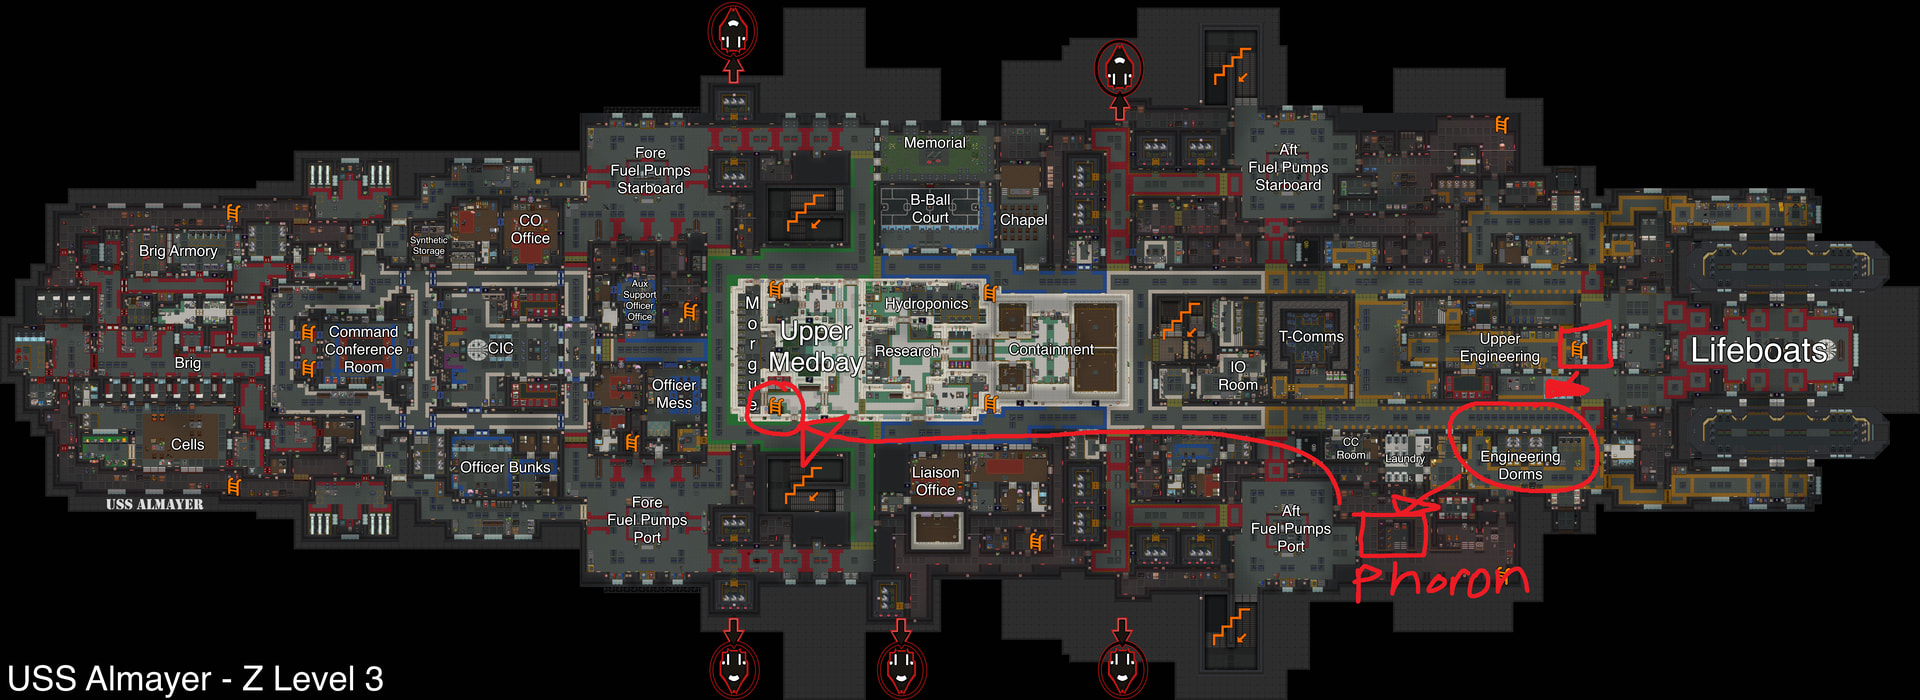
As soon as you wake up, you’re going to want to pick up those 60 phoron bars on the third deck (You only need 50, but take it all, why not?). This will help fuel your cook station for High Explosive (HE) or FIRE chemicals.
As soon as you do that, go down the medical ladders into Mid-Deck. As you do, scrouge around for metal by taking a crowbar to metal barrels. You’ll want to collect about 40 metal sheets, but you may collect a full stack of 50. It’s very easy to get. Don’t worry if you don’t get any metal either, because the Almayer has many pathways to get metal.
OT Shop:
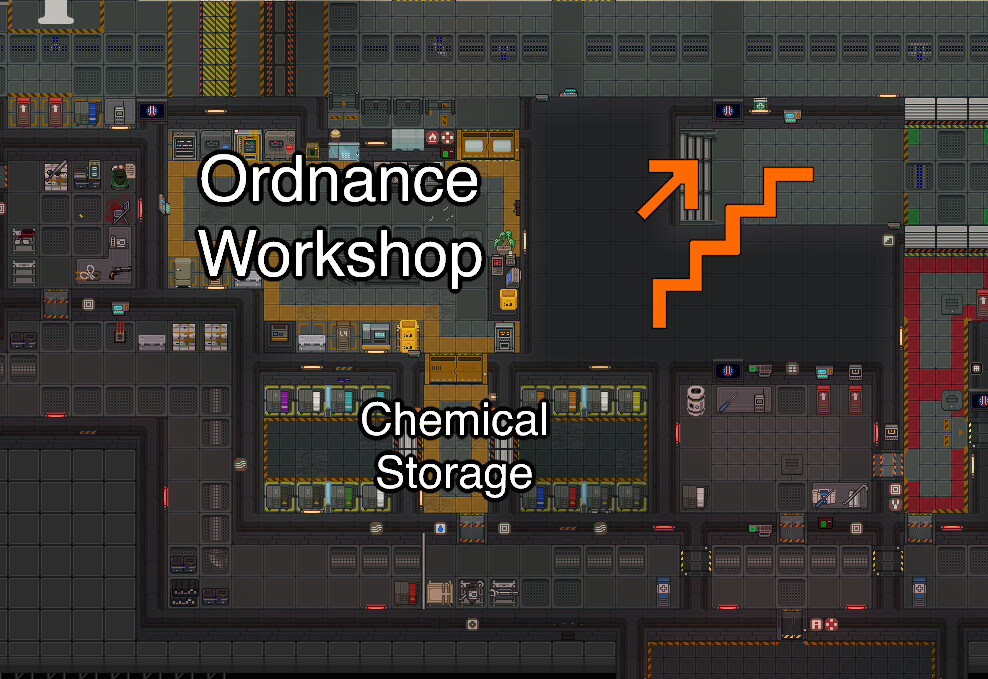
Welcome to the shop. This is where you’ll do most of your cooking and possibly exploding yourself to death if you’re not careful. Don’t worry. I’m here to help. In the upper left corner of the shop, you have your autolathe, army lathe, and various other machines that you will rarely use.
Autolathe: Used to print igniters, remote signalers, timers, and proxy sensors
Armylathe: Used to print all your explosive containers, such as M15 grenades and Mortar shells
At the south of the workshop is your chemical mixer and grinder - This is where you’ll be doing most of your fixing. Below the workshop itself is chemical storage, where you’ll be doing most of your mixing.
Remember those phoron bars and metal you have? Fantastic. Take a bluespace beaker and insert it into the grinder. You can recycle the normal 60u bucket in one of the lathes. Go ahead and insert either metal or the phoron bars into the grinder.
Pro-tip: You don’t have to wait for the grinder to finish, just take another bluespace and swap mid-grind to skip the ‘timer’.
With either liquid phoron or liquid iron (from the metal sheets), go ahead and find an empty reagent tank - those should be pure white and if you examine them, they’re empty.
Pro-tip: Use an empty hand on one of the tanks. This allows you to quickly set the dispense amount. In addition, if you alt click with an empty hand on the tank, you can switch between dispense and intake. The light will switch on the tank: Orange means the tank is intaking whatever container you are pouring into it, Green means the tank is dispensing whatever is inside the tank into the container you are using on it.
Keep grinding the reagents until you get a tank of 1000u phoron, and another tank of 1000u iron. This should last you almost the entire round, due to your limiting factor being metal for explosive containers.
Pro-Tip: Each reagent should only be needed to be ground twice (500u per grind)- Do not forget to eject the reagents before switching to the other I.E - Eject Phoron before grinding metal.
Pro-Tip: In addition to all of this, make sure to unlock that grey/black locker next to the grinder. It contains IMP rocket bags, which hold vastly more space than your satchel. Put it on to make your process go much faster.
Finding more Metal:
Speaking of metal - there’s plenty around the ship, but refer to the picture below to find quick metal nearby. This picture also locates the areas of the OB cannon, Anti-air (AA) console, and chemistry. Inbetween the OB cannon and the AA console is the control room, in which there is plenty of metal barrels to break down.
Picture, Metal Locations:
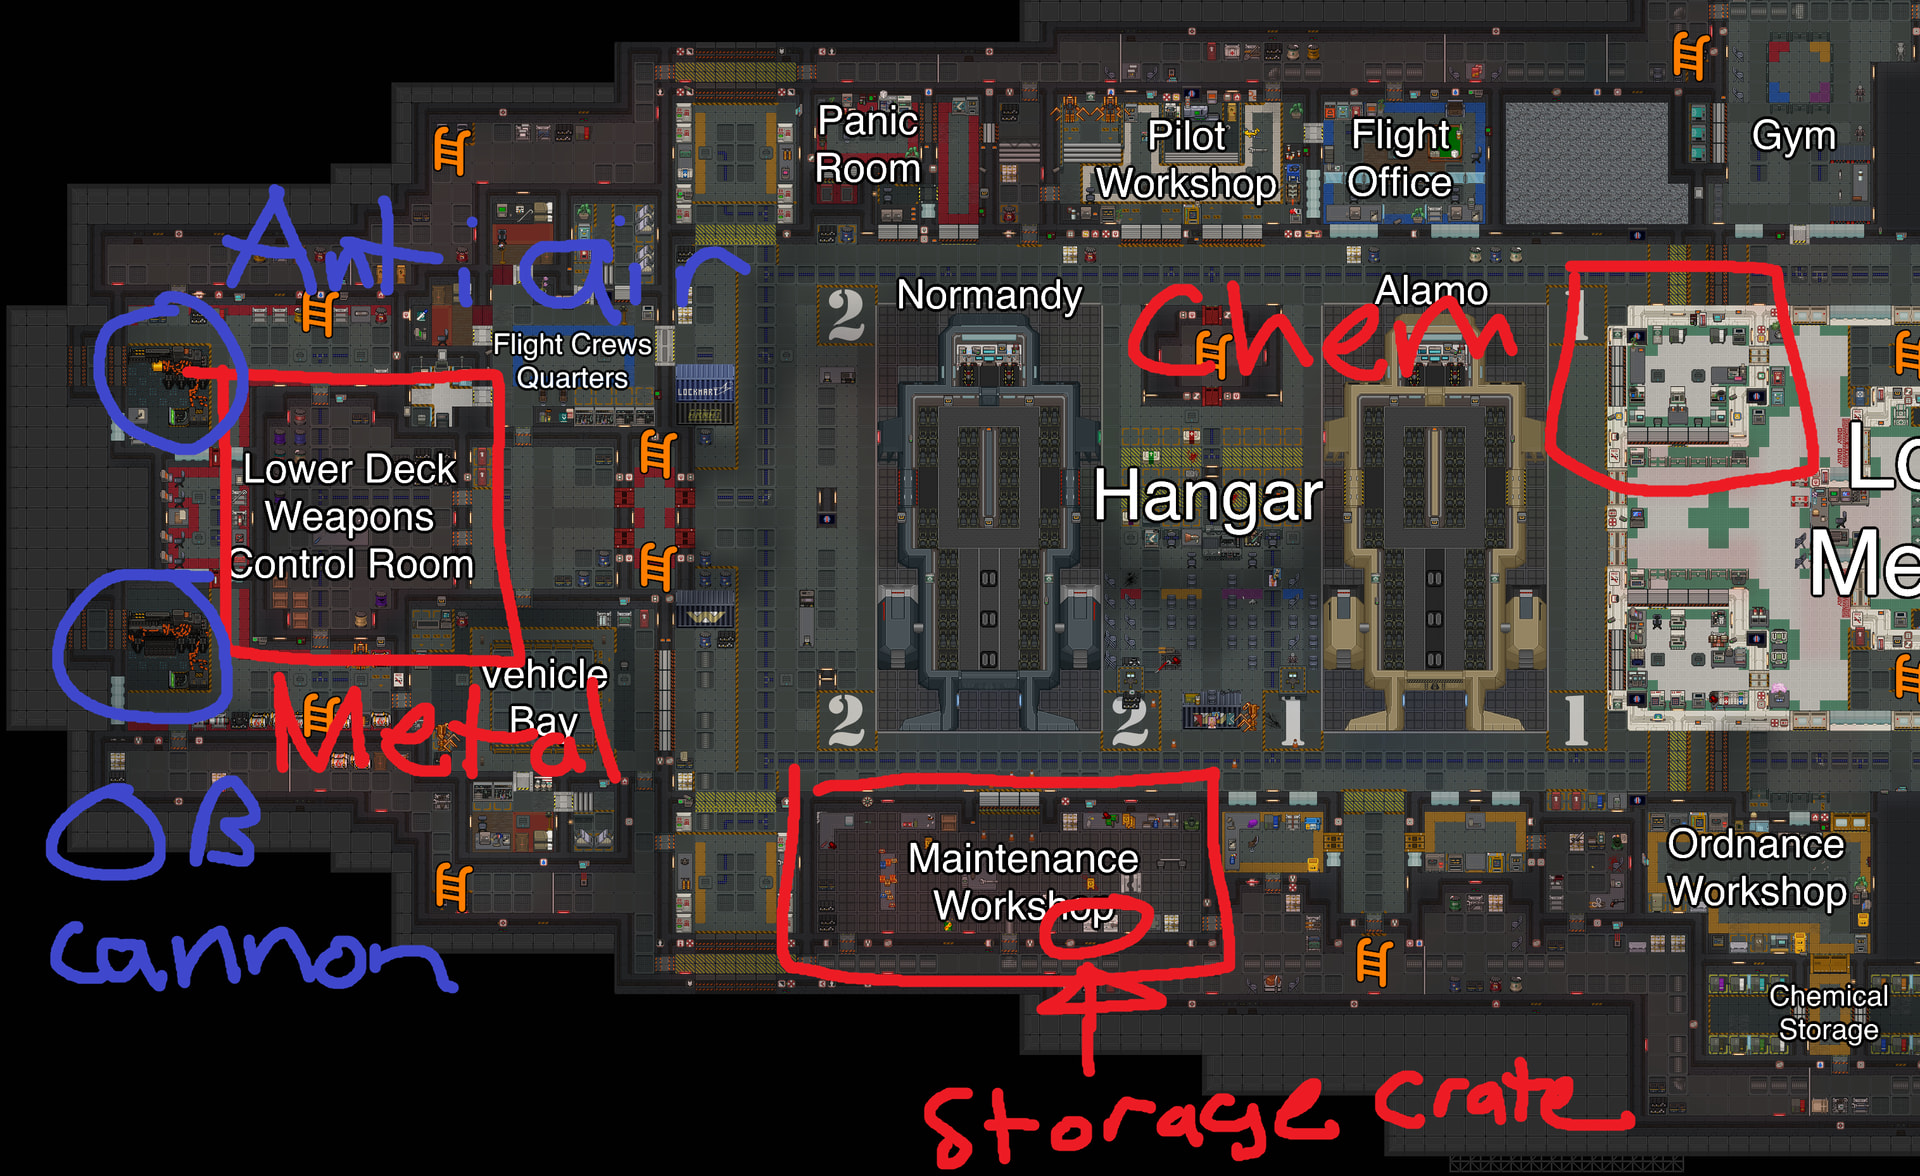
Inside the Maintenenance workshop, there is a crate labeled “Storage Solutions”. You want to NOT break it down immediately, but instead drag it to your OT workshop first. Once there, you can crack the crate open. DO NOT use a wrench to break down the tables and shelves, but instead insert them into the lathe. This generates more metal overall.
Faster Octogen:
The best HE compound you can create is Octogen. Let me introduce you to some tips and tricks to make it safer, more reliable, and faster.
First, you want to make Formaldehyde (Form). We do this by getting 40u methane, 40u phoron, 40u oxygen (IN THIS EXACT ORDER) into the silver beaker. The silver beaker is located in the Industrial Freezer (Fridge looking thing) inside chem storage. You may do this faster by setting the dispense amount on each tank to 40u. This will then make the mixture bubble and create a smoke cloud after a couple of seconds. IF YOU BREATHE THIS CLOUD IN WITHOUT PROTECTION, YOU WILL GET CLONE DAMAGE. Clone damage is fairly uncommon, and some doctors don’t know how to fix it. If so, tell them to insert you into the cryo tube with cryox to heal the clone damage.
To avoid this damage, you want to don the biohazard suit + hood, located in chemical storage.
Pro-tip: After you mix Form, you can press Z to put the lid on the silver beaker (at the moment, it doesn’t have an icon, so it’ll be invisible), if you do so, you will then see that the lid has prevented the gas from escaping the beaker, avoiding the need to don a biohazard suit.
With 120u Form in hand, we want to turn it into Paraformaldehyde (Paraform). Take the beaker to the water tank, and switch the tank to 20u, no more. If you switch it higher, you are at risk of Fraction Point Errors (FPE). An FPE is when the chemical has a value of 0.999999, which causes significant heartache when you’re trying to mix whole numbers - and you need whole numbers to mix properly. Dispense water into the silver beaker until full.
Now with a silver beaker of 120u Form and 120u water. You can turn this into Paraform by freezing the mixture. At this point, most people would put that beaker into the freezer whole and leave it there. This is a mistake, and slows down your process significantly. You can instead put the beaker into the chem machine and put all the reagents into the buffer, before turning them into 60u bottles. This leaves you with four bottles of a 30/30 split between Form and water. These four bottles will then go into the freezer. This works on the principle of the ‘Square-Cubed Law’, in which we lower the scale of the 240u beaker into 60u bottles to generate more surface area that the freezer can work on.
Pro-Tip: The freezer works on four items at a time only. So inserting 8 bottles at a time will not work. Only four will be freezing - and afterwards the other four will be worked on.
After you put four bottles into the freezer, you should take back the silver beaker, and make another 120u of Form. This 120u of Form is now our basis for Hexamine. For mixing Hexamine, you MUST put on the biohazard suit. Hexamine violently splashes when mixing, and if it gets on your exposed skin, you take clone damage. There is a way for the splash to not hit you, but I lack the knowledge of this technique.
After you don the biohazard suit and have 120u Form in hand, mix ammonia into the beaker until you get 120u hexamine. Use your reagent scanner to confirm the correct amounts.
Gather two mop buckets, which is located in the vendor to the left of the army lathe. Set the dispense on each to be 120u. In one bucket, you’ll dump the hexamine. This is also where you’ll dump your Paraform as soon as it’s done freezing, meaning you’ll have 120u hexamine and 120u Paraform in one bucket. With the other bucket, you’ll dispense 60u ammonia, then fill it up to the brim with Poly Acid. This means you’ll have 120u Ammonium Nitriate and 120u Poly acid in the end.
Once you have both of these mop buckets full, you’ll pour them into a bluespace beaker. First you’ll pour the PURPLE (120/120 ammonium nitriate + poly acid) bucket, then the WHITE (120/120 Hexamine + Paraform) bucket. Repeat this action twice. Pouring White instead of Purple first will be bound to generate Cyclonite, which is great, but not what we want.
If done correctly, inside the bluespace will then be 240u of Octogen, which you can split into bottles to be able to make four of whatever explosive you want.
Reducing Blast Radius:
On rocket/mortar warheads, or any other explosive container, you may ALT click them to reduce their blast radius. This is heavily recommended on rocket warheads, as the FF may knock back marines, when they need to be standing up to follow up on SADAR shots. This reduced blast radius has no effect on shrapnel or fire radius, only for any explosive radius (shockwave).
DO NOT DO THIS ON ASSEMBLED (Green) GRENADES, AS THAT WILL CAUSE THEM TO DETONATE - Do this Alt Click move only when the grenade is blank or has a yellow assembly
Chem refill:
Run out of chemicals handsome? Don’t worry. First, you should head to the yellow chem locker in the southwest of the shop. There’s a couple of hand-held tanks there that can refill your most used chems like ammonia and poly acid.
Once you run out of those, then head north from the shop and chemistry will be there. This is where you can get refills - hopefully none of the docs are too busy. I recommend asking them for a tank of phosphorus, since it’s a very potent fire multiplier that you don’t have a lot of besides three beakers in the chem locker. You can also ask them for refills on your empty tanks (If you can’t move a certain tank, it’s probably wrenched down).
If there are no docs or if they’re being rude to you, you can order chemical tanks from REQ as well. You can justify this purchase by telling REQ they don’t have to buy anymore rockets for the SADAR - as you can provide. Bring a bag, because it comes with a lot of hand-held chem tanks.
Infinite Ethanol:
You know the officers have a booze machine in their mess hall? They don’t want you to have it though. You can be a good boy and ask for permission from the CE, or whoever is in charge at the time. Justify it by using it in explosives. If they’re too busy to answer? Well, you do have a toolbelt. Hack in, and just nab it. I’m not gonna tell you how to do that though, but that option is there. ANY alcoholic liquid dispensed via this dispenser has the same properties as pure ethanol besides a difference in colored flame (Find your favorite!)
(Landon Hughes in no way shape or form endorses the theft of property of Officers on the USS Almayer)
Booze Machine:
OT Payload Calculator:
This calculator has been the basis of all my explosive mixing, and I definitely recommend you try it out. I’m putting it here because it’s been lost to time, but I sincerely hope somebody picks it back up. At the moment, it’s slightly outdated with the SADAR rocket capacity (180 instead of 210), but still works perfectly fine.
My Recipes (Or recipes that work well):
Rockgut’s HE-AT Rocket (Max HE, Small Max Intensity Fire, Small smoke cloud, 30 shrapnel):
60 Octogen
100 ANFO
20 Phosphorus
30 Iron
(One tile miss = great damage, Direct = Kill except Crushers, Ravs, Queen - They get wounded heavily though) (DO NOT FORGET TO REDUCE THE BLAST RADIUS)
Hatman’s M15 Offensive Fire (Max intensity, medium radius, low duration):
60 Ethanol
20 Phosphorus
20 Phoron
(This mixture does not mix properly if you try to mass produce. Put only the required ingredients in the buffer once at a time) (This grenade has been dummy proofed to cause as little FF as possible unless FF is intended)
Kryth’s Runner-B-Gone Mine (Max intensity, Max fire radius, Small explosion, 40 shrapnel)
60 Ethanol
10 Phosphorus
10 Welding fuel
40 Iron
(This mixture mixes properly for mass production. Remember to reduce the blast radius. Recommend Igniter+Igniter for tripwire assembly instead of Igniter+Proxy)
Tennants Mini-HE OB Mortar Shell (Max HE, Will gib and will fuck marines/xenos up)
120 Octogen
120 ANFO
(Do not reduce blast radius for max effectiveness)
StarFire Mortar Shell (Max Intensity, Duration, * Radius)
240 Ethanol (Or any alcoholic drink)
(Good for hitting xenos behind their defenses due to the Star shape)
Conclusion:
I’m sure I’ll remember something and I’ll edit it in, but I hope this has helped a bit for all you aspiring OT’s, or even any OT who doesn’t know some of these tricks. Thanks for reading. I know it’s a bit lengthy and wordy, but hopefully you can gleam some knowledge out of this guide.